


I’ve been working on a content marketing playbook and needed to turn it into a professional-looking document. Adobe InDesign felt like the obvious choice because it’s built for layouts like e-books, brochures and long-form content.
But when I tried adding a table of contents (TOC), it wasn’t as straightforward as I expected. Unlike Word or Google Docs, InDesign doesn’t just auto-generate a TOC the moment you add headings. You need to set up paragraph styles, map them to TOC entries, and format everything manually.
If you are a marketer, content creator, or anyone putting together a long-form document in InDesign, this guide walks you through how to make a table of contents in Adobe InDesign.
Bonus: I will also share a simple way to create a table of contents with Venngage’s Table of Contents Maker and provide some table of contents templates.
Why use a table of contents?
Can you see the table of contents for this blog on the left side of your screen? It shows you which sections we’ve covered and how the information is arranged. If you want to go straight to a section, you know exactly where to click.
That’s exactly what a table of contents does — it helps readers find what they need without going through the entire document. While it’s not always necessary, it becomes especially useful when you’re working with longer formats like reports, books, magazines, business brochures or catalogs.
A good TOC tells readers what information they’ll get and where to find it. It also helps you as the creator to plan and structure your content more clearly.
Here’s why adding a TOC in InDesign is worth it:
- Makes navigation easier for the reader.
- Gives your document a clean, professional layout.
- Can be updated quickly if the content changes.
- Works well for both print and digital formats.
Related: 11 Best Report Design Ideas & Tips for Engaging Reports
How to create a table of contents in Adobe InDesign
Let’s see the step-by-step process to create a TOC in Adobe InDesign
Step 1: Style your headings
Before you insert a table of contents, you need to structure the document properly with different heading tags for your titles and subheadings — like H1, H2, H3, and so on.
InDesign doesn’t automatically recognize headings based on how they look. It reads them based on Paragraph Styles. So, if you want your TOC to work properly, every heading in your document needs to have a paragraph style assigned to it. This is the most important step for generating an accurate and dynamic TOC.
If you’re new to InDesign, this part might take a little time — but once you’ve set up the styles, the rest is easy.
Here’s how to create and apply paragraph styles:
- Go to the top banner and click Type > Paragraph Styles.

- Select the text you want to make a heading. The Paragraph Styles menu will appear on the right side.
- Click the + icon and create a new style. It will be named as Paragraph Style 1 by default.

- Double-click Paragraph Style 1 and rename it as H1.

- In the dialog box, go to Basic Character Formats on the left menu and select the font and size for H1 tags.

- Choose the preferred font style and size. I have chosen Times New Roman font.
Repeat the same process for other heading levels, like H2 and H3. Basic Paragraph style will be your normal text.

Once you’ve applied paragraph styles throughout your document, you’re ready to generate the table of contents.
Step 2: Generate a TOC in Adobe InDesign
Go to the Layout option on the top menu and select Table of Contents. This will open a dialog box where you can adjust all the key settings.

Step 3: Adjust basic settings for the TOC
Here’s how to set up your table of contents properly.
Title
Under the TOC Style section, you’ll see a space to enter the title. You can name it Contents, Table of Contents, Index, or anything else. For the Style, select the H1 paragraph style so it appears as the main title of the page.

Contents
Now it’s time to choose which headings will appear in the TOC.
- Under Styles in Table of Contents, select the heading style you want to include (for example, H1).
- Click << Add to move it to the Include Paragraph Styles section.
- Do the same for H2, H3, or any other styles you’ve used.

Next, assign an Entry Style for each of the styles you’ve added. This controls how each heading level looks inside the TOC. Here’s one example setup:
- Title → H1 format
- H1 (Content Marketing Playbook) → H2
- H2 paragraph styles → H3
- H3 paragraph style → Basic Paragraph

This helps keep the TOC visually consistent with the rest of your document.
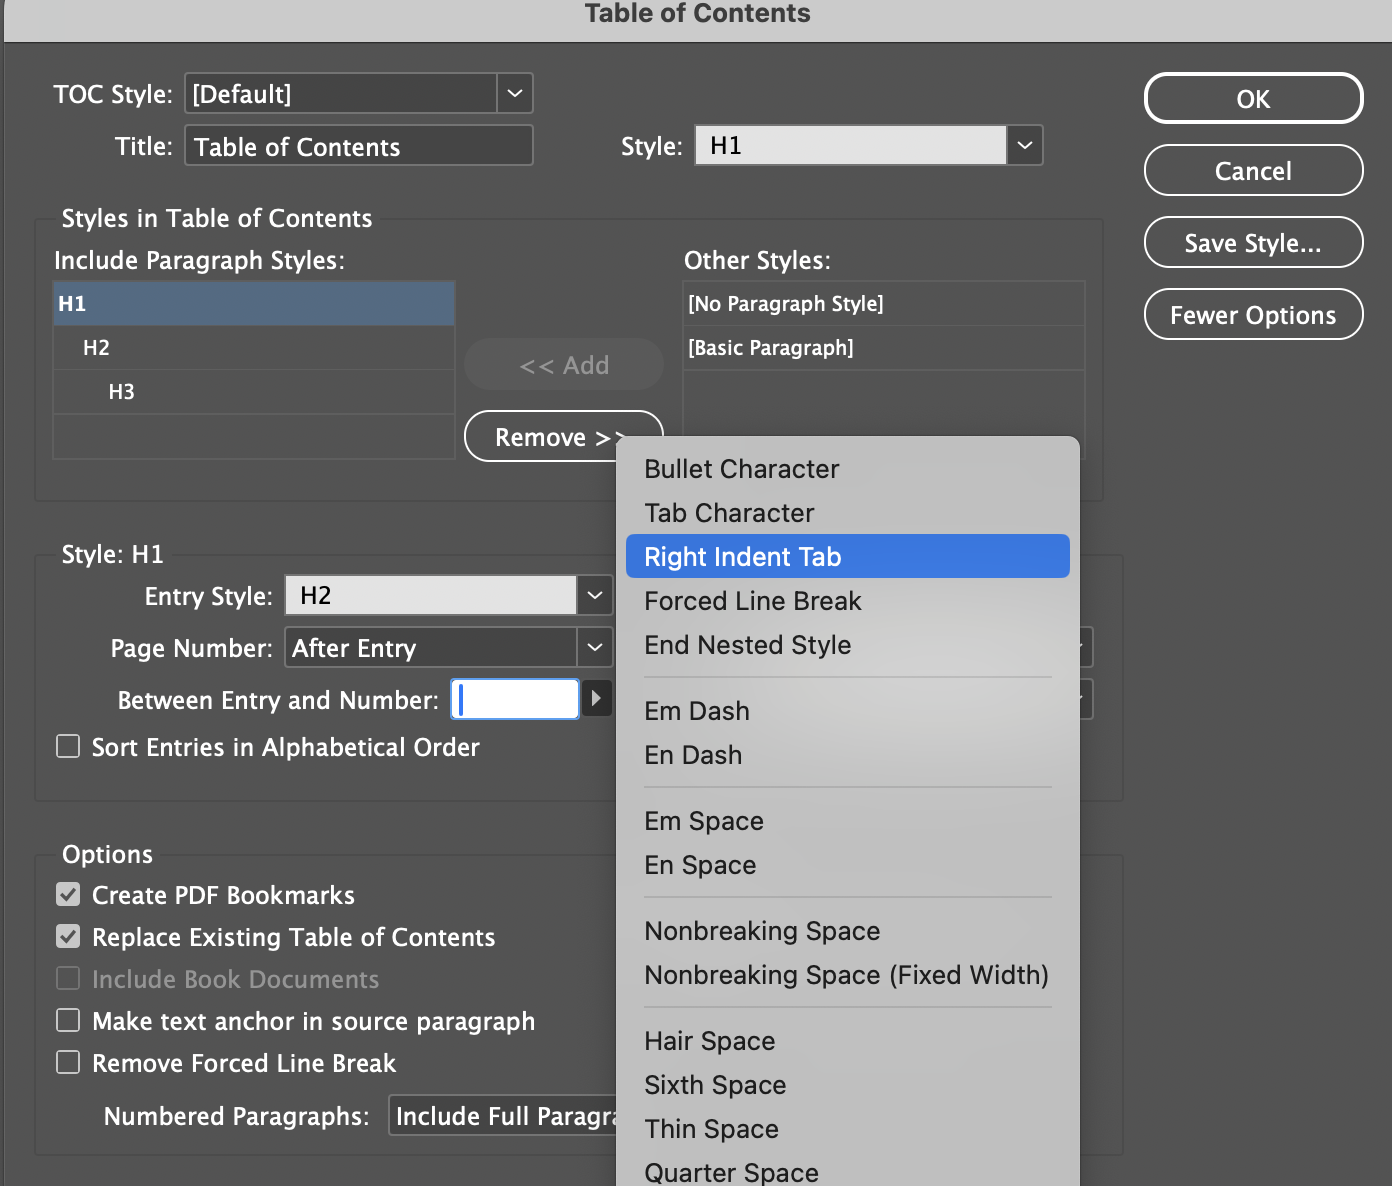
Now, click on the H2 entry in the list. Under Between Entry and Number, click and select the Right Indent Tab.

Remove the default “t” character and add the y character instead.
Repeat this step for the Basic Paragraph as well. This ensures that your headings and page numbers align properly in a single line.
Page numbering
If you’re placing the TOC at the beginning of your document, first add a blank page before the main content. However, you also need to adjust the page number to ensure that the TOC is not included in the total number of pages and the actual content starts from the first page.
To make sure your actual content starts at page 1:
- Go to the first content page.
- Select Layout > Numbering & Section Options.

- Instead of “Automatic Page Numbering,” choose Start Page Numbering at and type 1. This will now be considered the first page of the content.

Once all settings are in place, click OK. An arrow will appear, along with a small block of text. Drag the arrow to the blank page where you want the TOC to appear. Drop it there, and your table of contents will be generated automatically.
Related: 20 Professional Report Cover Page Examples & Templates
Step 4: Style the TOC in InDesign
You’ve inserted the TOC into your document, but it might look a bit plain. Let’s walk through how to style it for a clean and professional look.
1. Customize the characters between the heading and the page number
First, we’ll add the characters between the headings and page numbers to improve readability. You can add periods or small dashes.
- Go to Paragraph Styles > Tabs > Leader.
- Enter a period (.) or dash (-) in the box.
- Click OK.

To make sure the dots or dashes don’t stick too close to the text, add spacing around them:
- Go back to Table of Contents > Between Entry and Number
- Add a space before and after the ∧y right indent tab symbol
- Select Preview to check how it looks

2. Adjust the spacing between the headings
Next, improve the visual spacing between each line in the TOC.
- Go to Paragraph Styles > Indents and Spacing.
- Increase the Space Before and Space After values.

This gives your TOC a more breathable layout and keeps it aligned with the rest of your document.
Here’s how the final TOC looks.

Update the table of contents
If you want to change a heading in the table of contents, you can change it in the main document and it will be automatically updated in the TOC.
If the TOC doesn’t get updated automatically, go to Layout > Update Table of Contents.

You can also make other changes:
- Format the TOC titles, entries or page numbers by updating the corresponding Paragraph Styles.
- Change page number formats (like 1, 2, 3 or i, ii, iii) by adjusting section numbering under Layout settings.
- Add more paragraph styles or change the TOC title by editing the TOC Style itself.
Advanced techniques to make a table of contents in InDesign
Here are a some advanced to make the table of contents look more professional.
Customize entries
InDesign lets you fine-tune TOC entries beyond the basics. You can:
- Add specific text before or after each entry (for example, “Chapter:” before each heading).
- Choose different sorting methods, such as alphabetical order instead of document order.
- Use different styles for different heading levels to visually group your content.
These options give you more control over how your TOC looks and reads.
TOC for books
If you’re working on a book project that spans multiple InDesign documents, you can still generate a single, unified table of contents.
- Open the Book panel from File > New > Book.
- Add all relevant documents to the book.
- Then generate the TOC from within the Book panel, instead of a single document.
InDesign will pull headings from across all files and combine them into one table of contents.
Related: Ebook Guide: Design Ideas, Templates, Creation & Publishing
Digital TOC (hyperlinks)
When you export your document as a PDF or EPUB, InDesign automatically turns TOC entries into clickable links — as long as you’ve set it up that way.
To check this:
- Go to Table of Contents > Options.
- Make sure Create PDF Bookmarks is selected.
- When exporting to PDF, ensure that Include Bookmarks is enabled.
This makes your digital document easier to navigate, especially on mobile or tablet devices.
Alternative to creating a table of contents in InDesign
Phew! That was the full process of making a table of contents in InDesign. While the final result looked just the way I wanted — clean and professional — it took me over an hour to get everything right.
InDesign is a powerful tool, but it’s also technical. If you’re not a designer, there’s definitely a learning curve.
If you are looking for an alternative to InDesign to create a TOC, try Venngage. Venngage’s Online Table of Contents Maker is a simple, straightforward tool that lets you set up a TOC for any document in minutes.
Here’s how it works:
Step 1: Select a table of contents template
Venngage offers a large variety table of contents templates for reports, business plans, employee handbooks, books, recipes and whitepapers. You can pick a template as per your document’s type or theme.
For example, if you are writing a business report or a guide, here’s a simple table of contents template you can use.

If you are creating a company playbook for the team, you can use this table of contents example:

If you want a more fun and playful table of contents template, you can go with this one.

Step 2: Customize it as per your preferences
Most people skip over the TOC page without thinking twice. It feels like a formality. But a good table of contents makes it easier for your reader to find what they’re looking for. Without it, they might just give up on your document altogether.
With Venngage, you can make your TOC both functional and appealing. It enables you to:
- Easily edit the dummy text to match your document’s headings.
- Change text fonts and colors.
- Add icons, borders, or illustrations.
It takes only a few clicks, and no design experience is required.

Step 3: Download it in PDF or PNG format
Once you’re happy with the design, you can preview your TOC and download it in either PDF or PNG format.
- If you want to attach it to a digital document or print it as part of a book, go with PDF.
- If you’re inserting it into an existing file or slide, PNG is the better choice.
You can also merge the downloaded TOC with other documents using any free PDF tool.
Create a table of contents with Venngage
Creating a TOC in InDesign works great if you’re already familiar with the software. But if you’re in a hurry or just want a faster way to get a clean, professional result, Venngage is a solid alternative. With pre-designed templates and a simple editor, you can create a polished table of contents in minutes — no design skills needed.


