


Whether you’re launching a new product or exploring a new investment strategy, uncertainty can often complicate crucial decision-making. This is where decision tree diagrams come into play. A decision tree is a chart that helps you visually outline different options in a scenario, evaluate the pros and cons of each choice, and make an informed decision.
Microsoft Word is a good starting point for creating a decision tree, offering user-friendly tools to design your diagram effectively.
In this blog post, I will share a step-by-step process on how to create a decision tree in Microsoft Word, to improve decision-making.
Bonus: I will also share an alternative to creating a decision tree in Microsoft Word using a Decision Tree Maker and free decision tree templates.
Click to jump ahead:
- Step-by-step guide for creating a decision tree on Microsoft Word
- How to make a decision tree in Venngage?
- Create decision tree diagram with Venngage
Step-by-Step Guide for creating a decision tree on Microsoft Word
To create a decision tree in Microsoft Word, here are the steps you need to follow:
- Step 1: Open Microsoft Word and create a new document.
- Step 2: Insert a central idea using shape.
- Step 3: Connect shapes with lines.
- Step 4: Label nodes and branches.
- Step 5: Format the decision tree.
- Step 6: Add titles and explanations.
- Step 7: Add navigation.
- Step 8: Review and finalize the decision tree.
Let’s understand these steps in detail!
Step 1: Set up your document
First, open the Word app. If you are using Word on online Microsoft 365, it’s better to switch to the Word app on your device because there are limited options to add shapes and customize the design in the online Word version.
Go to Microsoft Word
- Open Microsoft Word app on your device.
- Go to Files > New > Blank document.
If you want to create the diagram in an existing document, insert a new page so that you have enough space to add different shapes and text.
For this, go to Files and open the document where you want to create the diagram.
Tip: Start with a fresh page to create a decision tree in Word because you need to add multiple shapes, text boxes and lines. A blank document provides a clutter free space so you can easily customize your design.
Step 2: Insert shapes
Before you start creating a decision tree, have a rough layout in mind so you can add shapes (called nodes) accordingly.
Let’s see the different shapes you can use in a decision tree:
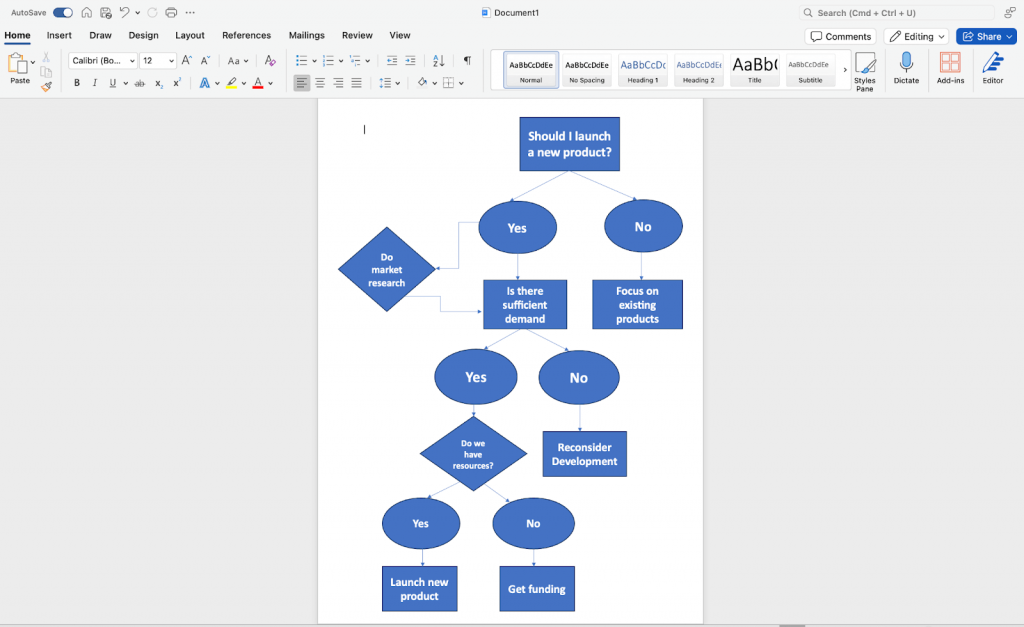
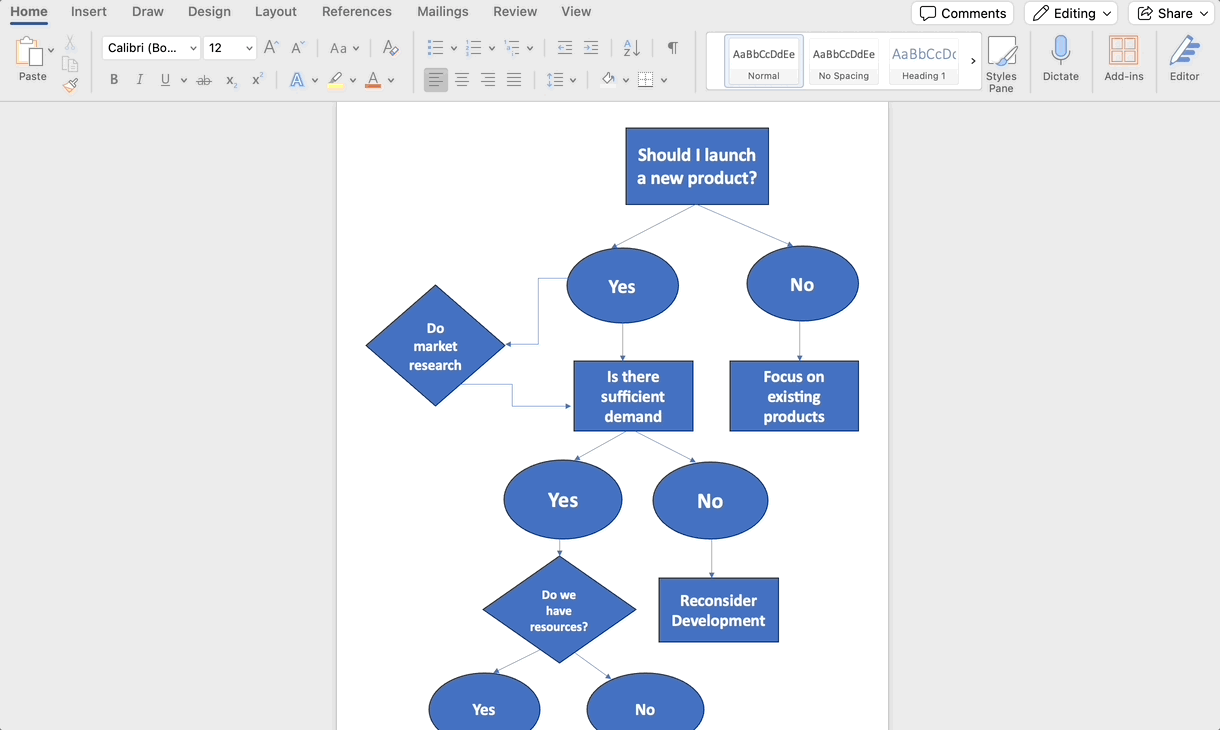
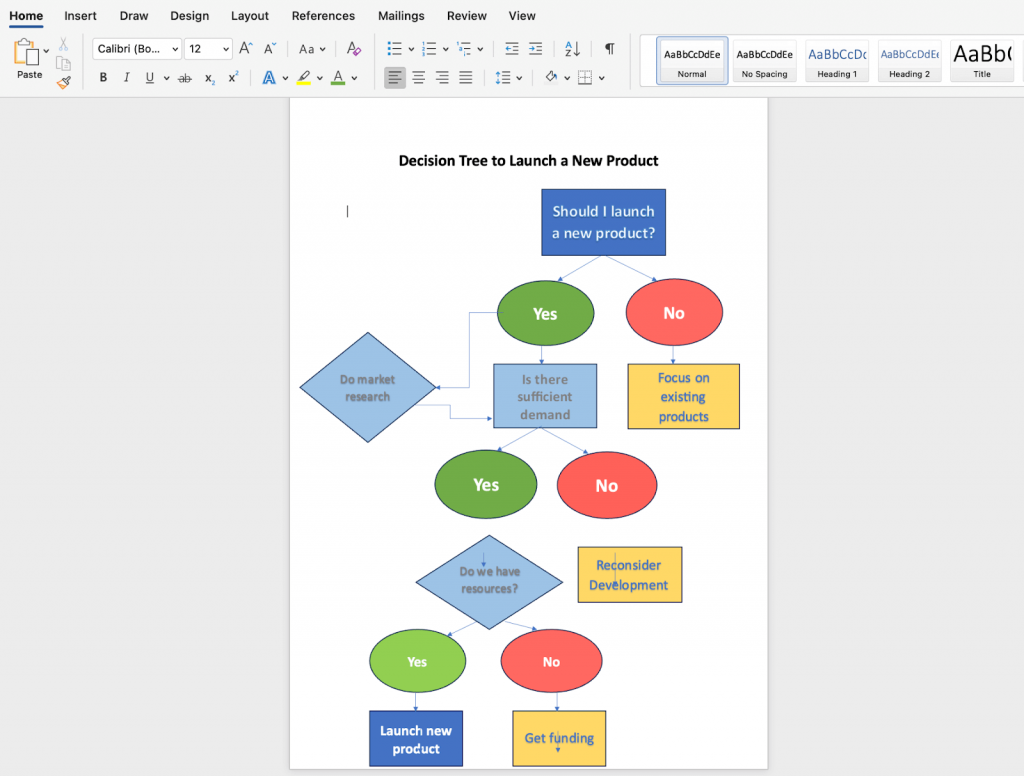
- Rectangle (Decision Node): This represents the problem statement you want to solve or decide. For example, you can add questions like “Should I launch a new product?” and “Should I hire more team members?” From here the tree branches out into different paths.
- Diamond (Decision Point): The diamond shape is used to show a decision point that can have different outcomes. For example, you want to offer a discount to the customers. The decision point could be “Is the customer’s total purchase over $100?” If yes, Offer a 10% discount (branch toward offering a discount). If no, proceed without a discount (branch toward regular checkout).
- Oval (End Nodes): The ovals represent the final decision or outcome — ‘Yes’ or ‘No’.
- Lines (Connectors): The lines or arrows are used to connect the shapes and ensure a proper flow of the decision tree infographic.
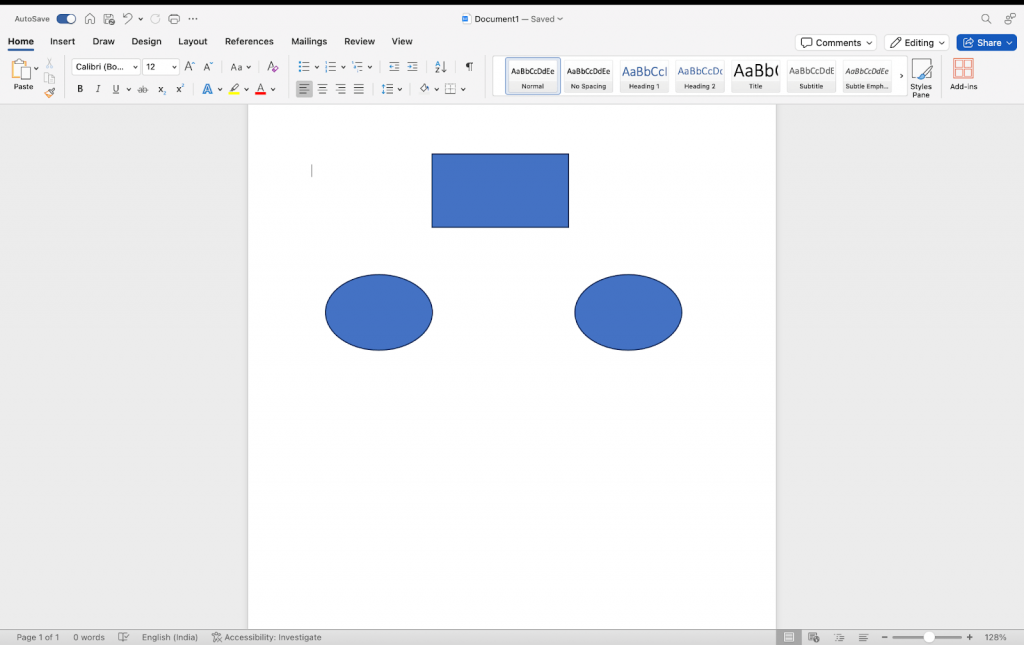
Add rectangles for decision nodes
- Go to Insert: Navigate to the Insert tab on the Ribbon.
- Select shape: Click on Shapes and choose the rectangle shape to represent decision nodes.
- Draw shapes: Click and drag the + sign on your document to draw the rectangle.
Add ovals for end nodes
Follow the same process to add oval nodes to your decision tree.
- Go to Insert: Under the Insert > Shapes menu, select the oval shape for end or outcome nodes.
- Draw oval shapes: Click and drag on your document to draw the ovals, as shown below.
Step 3: Connect shapes with lines
Now, it’s time to connect the shapes with lines to explain the flow of decisions. There are two types of lines you can use:
- Straight lines: They connect two shapes in a straight path and are are mainly used for simpler decision trees.
- Elbow connectors: These are right-angled lines that make 90-degree turns. We use elbow connectors for complex decision trees with multiple branches. It can also be used to connect shapes that have large space between them.
Add lines for connections
- Insert lines: Go to the Insert tab, click on Shapes and select a line (either straight or elbow connector).
- Draw lines: Click and drag to draw lines connecting decision nodes to end nodes.
Adjust lines for clarity
Properly join the lines to the shapes and align them for a neat, professional look.
- Align lines: Make sure lines are straight and clear. Use the elbow connector for complex branches.
- Adjust lines: Select the lines and use the handles to adjust their position and angle for better clarity.
Step 4: Label nodes and branches
Next, label the nodes and branches to provide context and convey the decisions and outcomes. Providing clear labels ensures easy decision tree analysis as you can see the implication of your decision.
Add text to shapes
- Go to shape and type text: Click on a shape and start typing to add labels directly into the shapes.
- Format text: Use the text formatting options in the Home tab to adjust font size, style, and alignment.
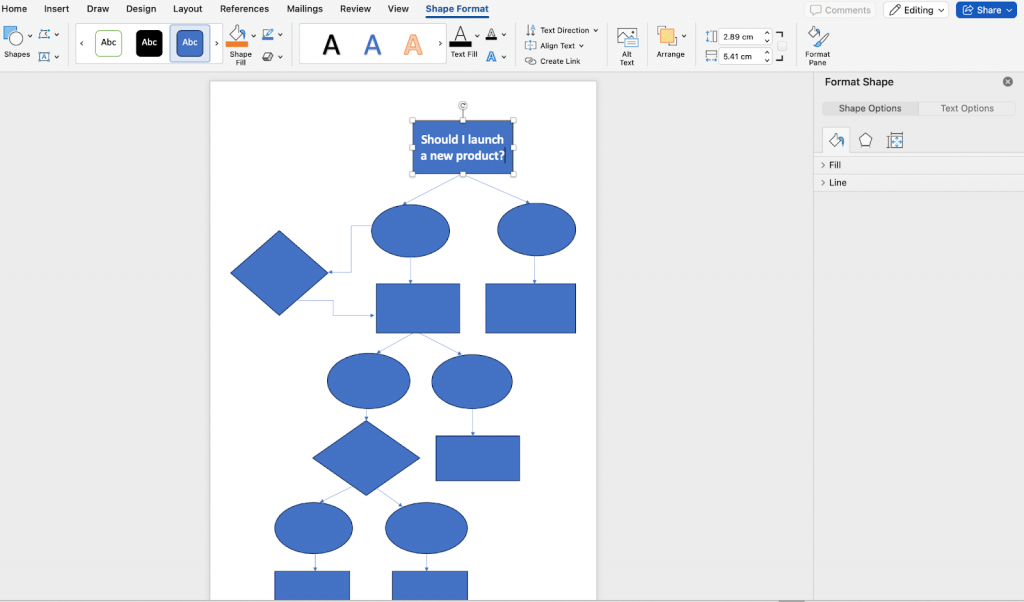
Here’s how my decision tree looks after adding all the shapes, connectors and text.
Add text to lines
If you want to reduce the number of shapes, you can also add labels to lines. Here’s how:
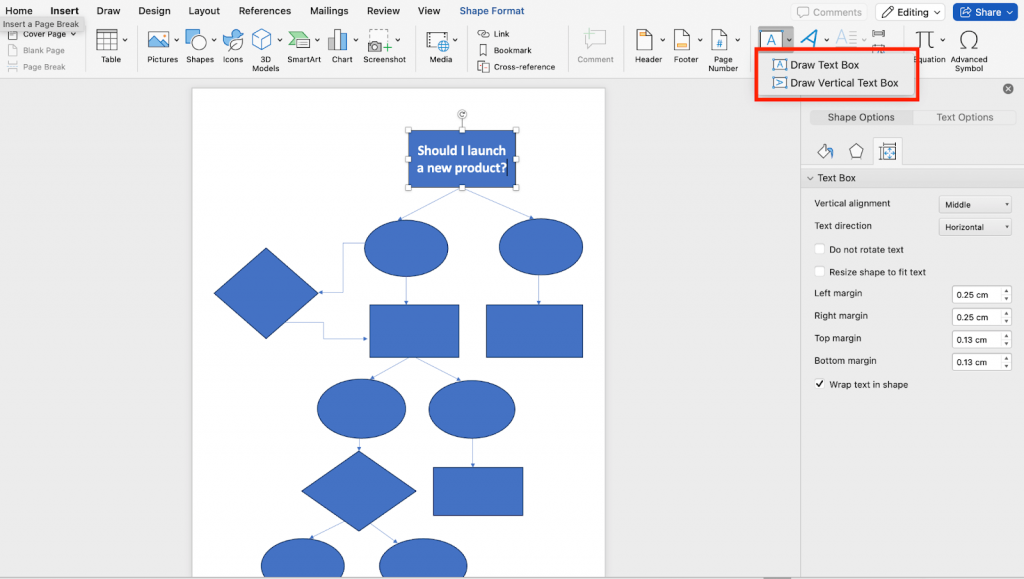
- Insert text boxes: Click Insert > Text Box and draw a textbox near the lines to add labels for branches.
- Type labels: Type in the conditions or criteria for each branch and format as needed.
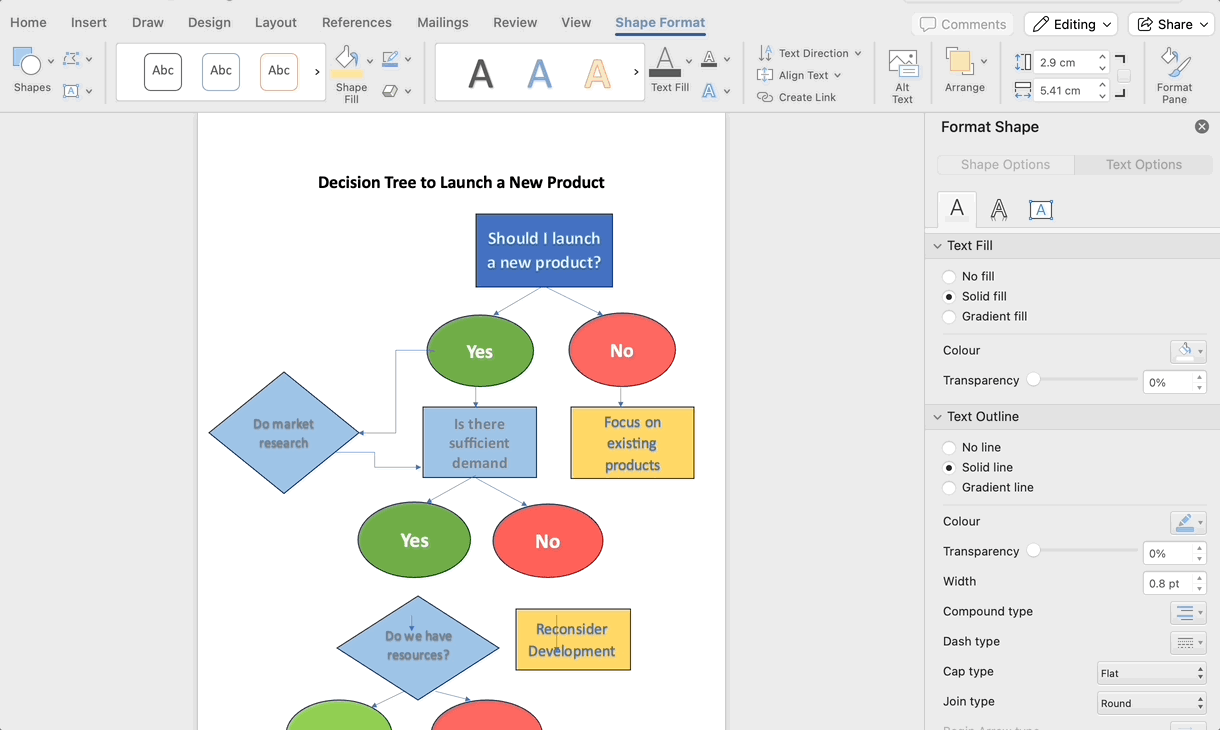
Step 5: Format the decision tree
Here comes the interesting part — formatting the decision tree. You can be creative and format shape or text colors, add borders, etc. to make the decision tree look visually appealing.
Let’s see how to customize the decision tree.
Adjust shape colors and styles
- Format shapes: Select a shape and go to Format > Shape Fill to change fill color, outline, and other styles. You can also change text style and format.
- Format line styles: Click on a line, go to the Format tab to adjust line color, weight, and style.
Tip: Use different colors to distinguish between decision nodes and outcome nodes for better visual clarity.
Align and distribute shapes
- Align shapes: Select multiple shapes, go to the Format tab, and use the Align option to align them.
- Distribute shapes: Use the Distribute option to evenly space the shapes.

Here are a few tips to customize decision tree in Word:
- Use consistent shapes: Stick to a limited selection of shapes (rectangles for decisions, ovals for outcomes) for clarity.
- Choose contrasting colors: Use contrasting colors for different nodes to enhance readability.
- Employ a clear hierarchy: Add nodes with different sizes (larger for primary decisions) to establish a visual hierarchy.
- Add borders and shadows: Use borders and subtle shadows to make shapes stand out and create depth.
- Utilize text formatting: Apply bold or italics for key terms to draw attention and emphasize critical information.
- Keep text concise: Use short phrases instead of long sentences to maintain clarity and reduce clutter.
Step 6: Add titles and explanations
Now, it’s time to finalize the decision tree. Start with giving a proper title to it. For example, I have added ‘Decision Tree to Launch a New Product.’
Insert a title
- Insert title: At the top of the document, insert a text box from the Insert tab and type in the title of your decision tree.
- Format title: Use text formatting options to make the title clear and prominent. You can change the text color, alter font size, or bold the text.
Add explanatory notes
If you want to provide more information about your decision tree, you can even add notes. There are two options to add notes:
- Add additional text boxes: Use simple text boxes to add context to shapes
- Use captions: Select any shape and right click on it. You’ll see an option to add a caption. Here, you can provide additional notes or information for each node.
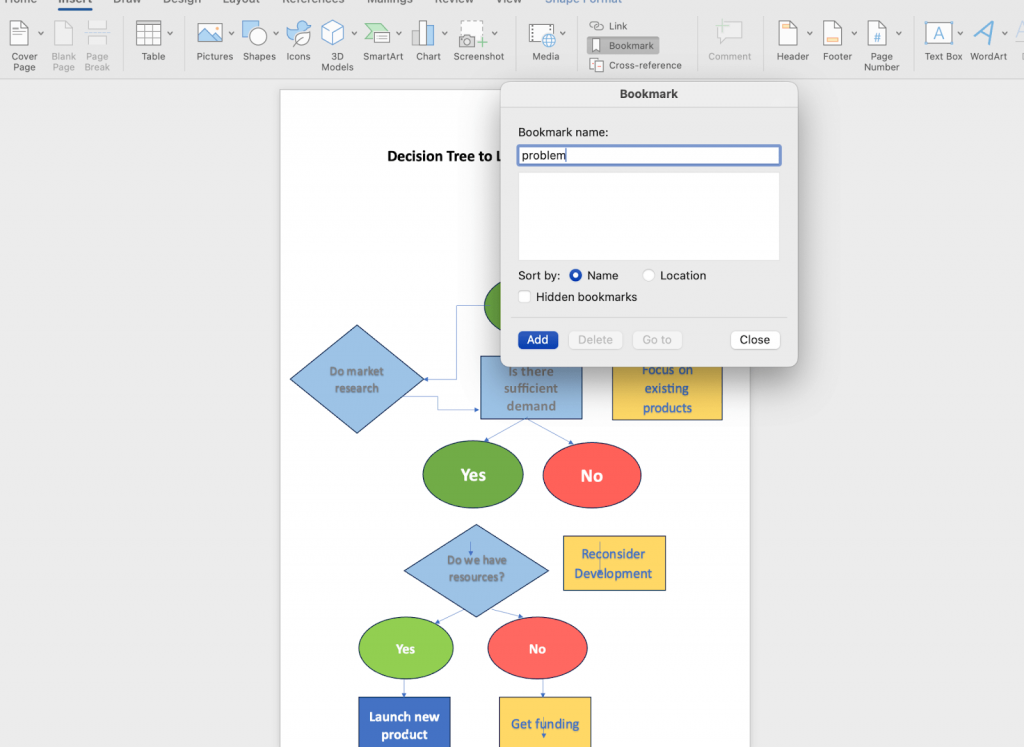
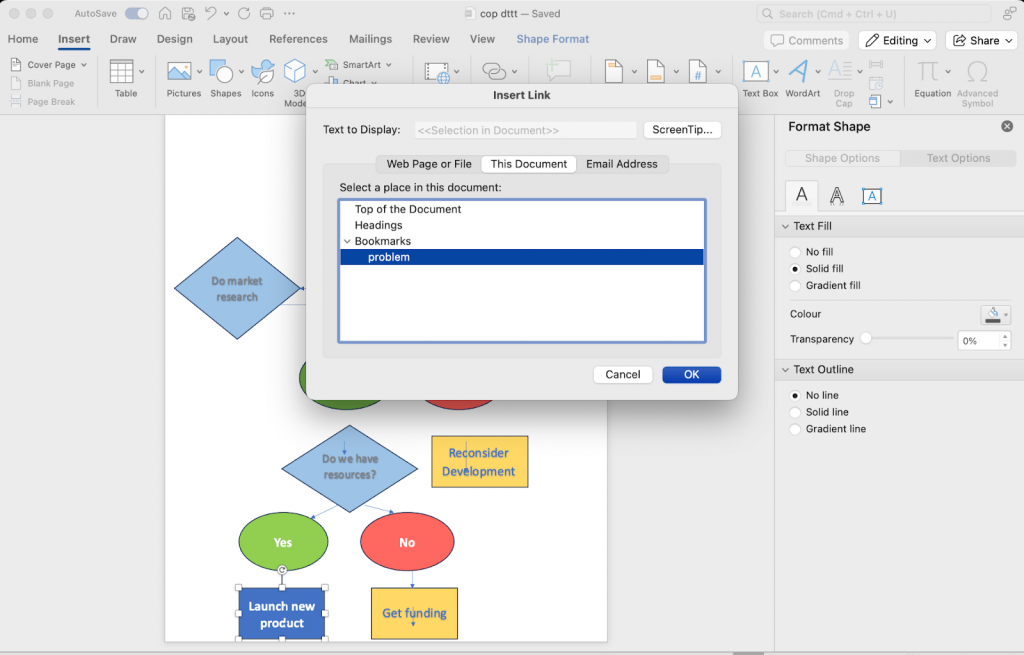
Step 7: Add navigation
For easy navigation of your decision tree, you can add bookmarks and links.
Create bookmarks
- Select any node you want to connect.
- Click Insert and go to Bookmark.

- Insert title of the bookmark and click Add.
Link to another node
- Create backlinks: Go to the node you want to connect it to. Right-click and go to Link (Ctrl+K)
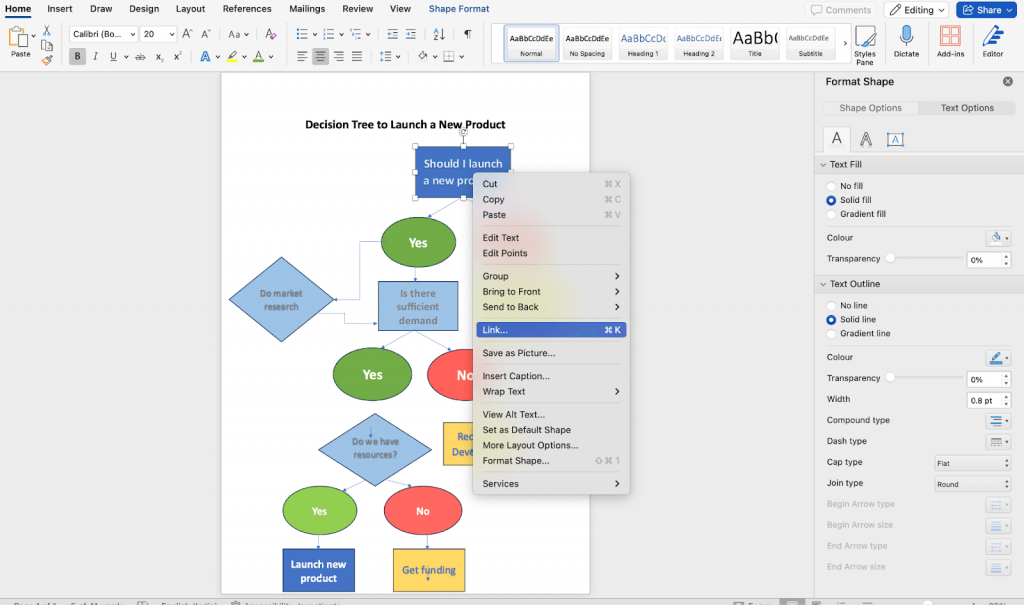
- Insert hyperlink: A dialog box will open. Go to bookmarks and connect the node to the bookmarked node. You can also link external resources.
Step 8: Review and finalize the decision tree
Your decision tree is ready now. Do a final check to ensure all the steps are correct, it’s clear to read and analyze.
Review the decision tree
- Check for errors: Ensure there are no errors or missing connections.
- Test hyperlinks: Make sure all hyperlinks are working correctly.
Save and print
- Save the document: Save your Word document.
- Printing: Print the document if necessary.
How to make a decision tree in Venngage?
Now, you can create a decision tree in Microsoft Word. However, the entire process is time-consuming. Adding shapes from scratch, inserting connectors, aligning the shapes and customizing the diagram can takea lot of time.
If you want to create decision tree diagrams quickly or make complex diagrams, Microsoft Word might not be the best option.
An easy and efficient way to design professional decision tree diagrams is to use decision tree software You can use Venngage’s Decision Tree Diagram Maker to to simplify the entire process. With hundreds of decision tree templates to choose from and advanced editing features, you can create a tree diagram within seconds on Venngage.
Here’s what you need to do:
Step 1: Sign up or log in to Venngage
You can easily sign up for a free account on Venngage using your email. If you are an existing Venngage user, simply login to your account to get started.
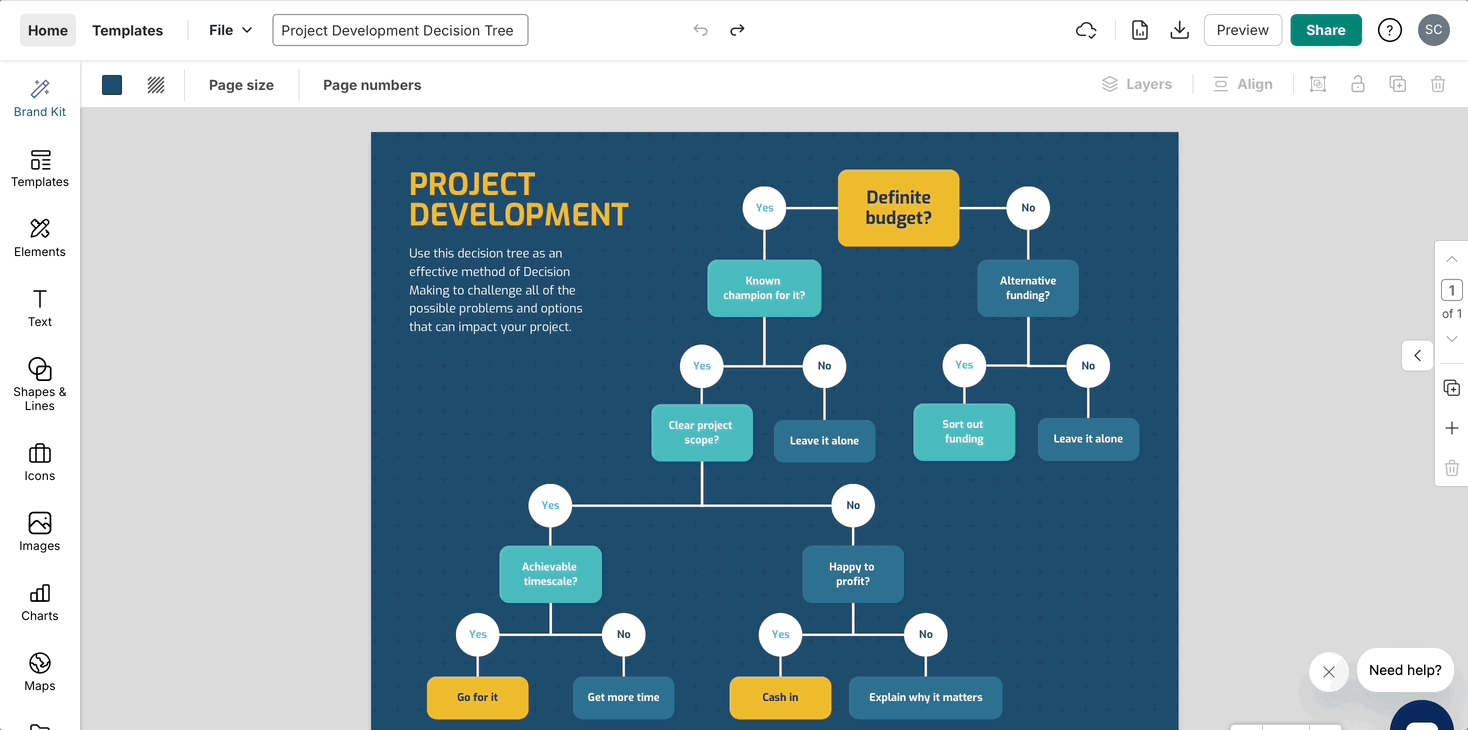
Step 2: Select a decision tree template from our extensive templates library
Go to our decision tree templates library. Select a decision free template based on your requirements.
For example, I have picked the Project Development Decision Tree Diagram Template.

Step 3: Customize the template
With Venngage’s drag-and-drop editor, you can easily customize text, add shapes, insert icons and images and change colors. The best part is that you can even customize the decision tree as your brand design guidelines. Go to My Brand Kit and select your brand’s color palette and other styles.
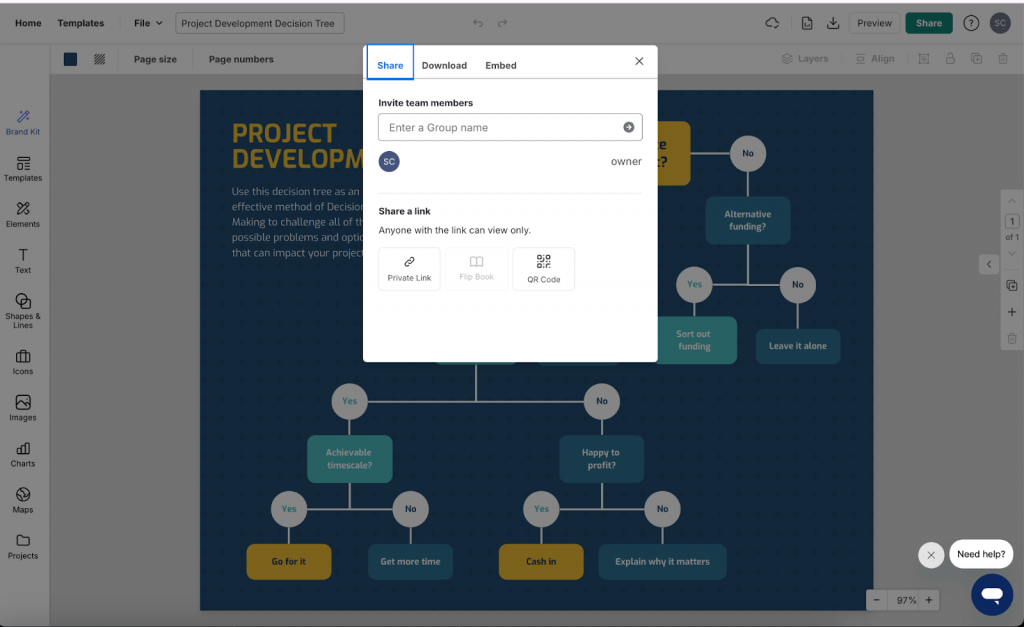
Step 4: Share the design and collaborate with others
Once you have created the design, you can quickly share it with others for review and feedback. Just go to Share and copy the link or the QR code to share your design with your team.
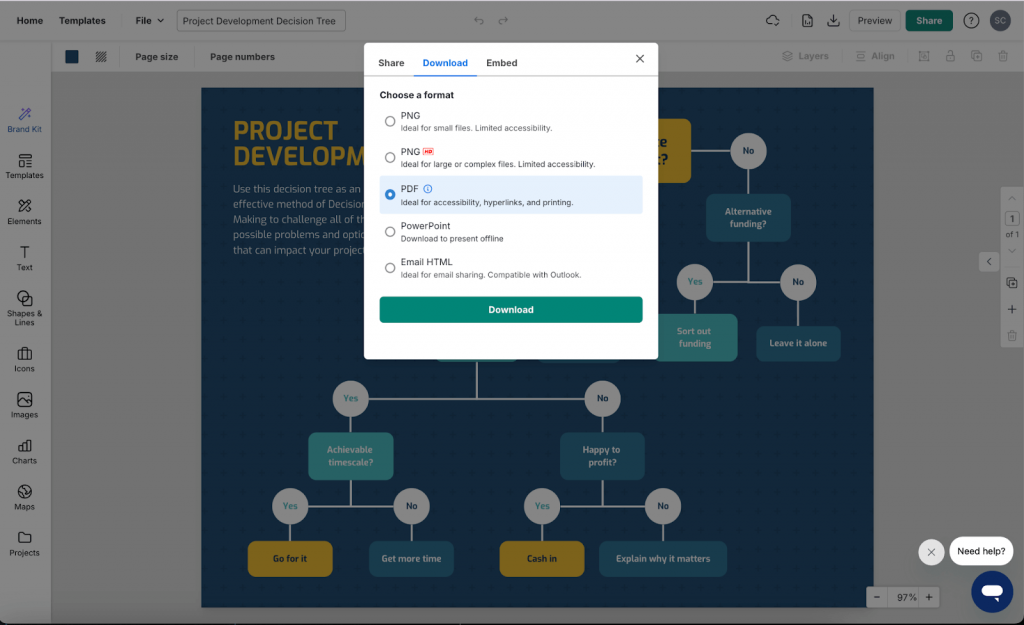
Step 5: Preview and download
Once the design is ready, it’s time to preview and download it. You can download it in PNG, PDF, Powerpoint or HTML format.
Create decision tree diagram with Venngage
Word is very handy for writing content or creating reports. But does it work for creating diagrams? Not so much. Even if you put in a lot of effort creating a decision tree diagram, chances are you won’t be satisfied with it because of the basic design.
This is where decision tree maker tools like Venngage can help you. The best part is that it saves you a lot of time as you can use Venngage’s free decision tree templates instead of creating designs from scratch. So, why wait? Get started with creating designs on Venngage.


