

Presenting research findings from surveys, academic papers or business reports can get overwhelming. You have a lot of information to share and need to make sure readers can easily understand the key insights.
This is where a research infographic helps. It visualizes the data and key takeaways, giving readers a clear overview of the research.
In this guide, I’ll show you how to create a research infographic step-by-step using an Infographic Maker, share research infographic templates and provide best practices for structuring and visualizing your findings.
What is a research infographic?
A research infographic visualizes the key findings from a study, survey or report. It combines concise text with charts, graphs, statistics and other visual elements to summarize the research clearly.
For example, you can use a research infographic to present survey results, compare groups, highlight trends or explain the findings of a scientific study.
Research infographics are commonly used in business reports, presentations, academic projects and research communication.
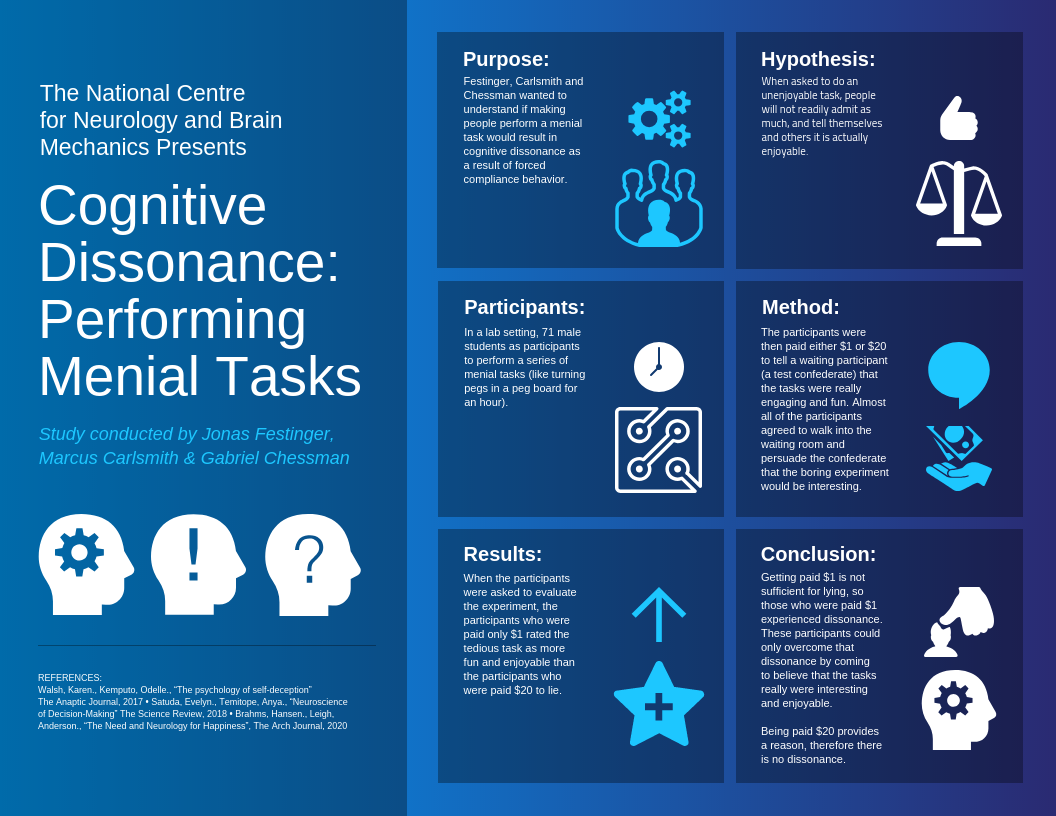
Here’s an example of a scientific research infographic with a neat design structure:
What should a research infographic include?
A good research infographic gives readers enough context to understand the findings without going through an entire report. Depending on your research, it can include:
- Research topic or question: What the study is about and what you set out to understand.
- Key findings: The most important statistics, patterns or observations from the research.
- Data visualizations: Charts, graphs or diagrams that make the findings easier to interpret.
- Supporting context: Short explanations that help readers understand what the data means.
- Conclusion or takeaway: The main insight readers should leave with.
- Sources: References for the data and research used in the infographic.
You don’t need to include every finding. Focus on the information that supports the main story you want to communicate.
How to create a research infographic in 5 steps?
Creating a research infographic may seem challenging, but breaking it down into clear steps makes the process easier.
From organizing data to designing the layout, these five steps will help you turn complex data into a visually engaging infographic:
Step 1: Define your audience
Start by deciding who the infographic is for. This gives you clarity on how much context to provide, whether you can use technical jargon and how much detail the design needs.
If the people reading the content will already have some basis for understanding the topic, then you don’t need to provide much explanation.
On the other hand, if you need to explain concepts to your readers, general facts can be helpful.
For example, if you’re presenting research on a new treatment to doctors, you can use clinical terminology and include more detail about the methodology or results. If you’re sharing the same findings with patients or the general public, you’ll need simpler language and more context around what the results mean.
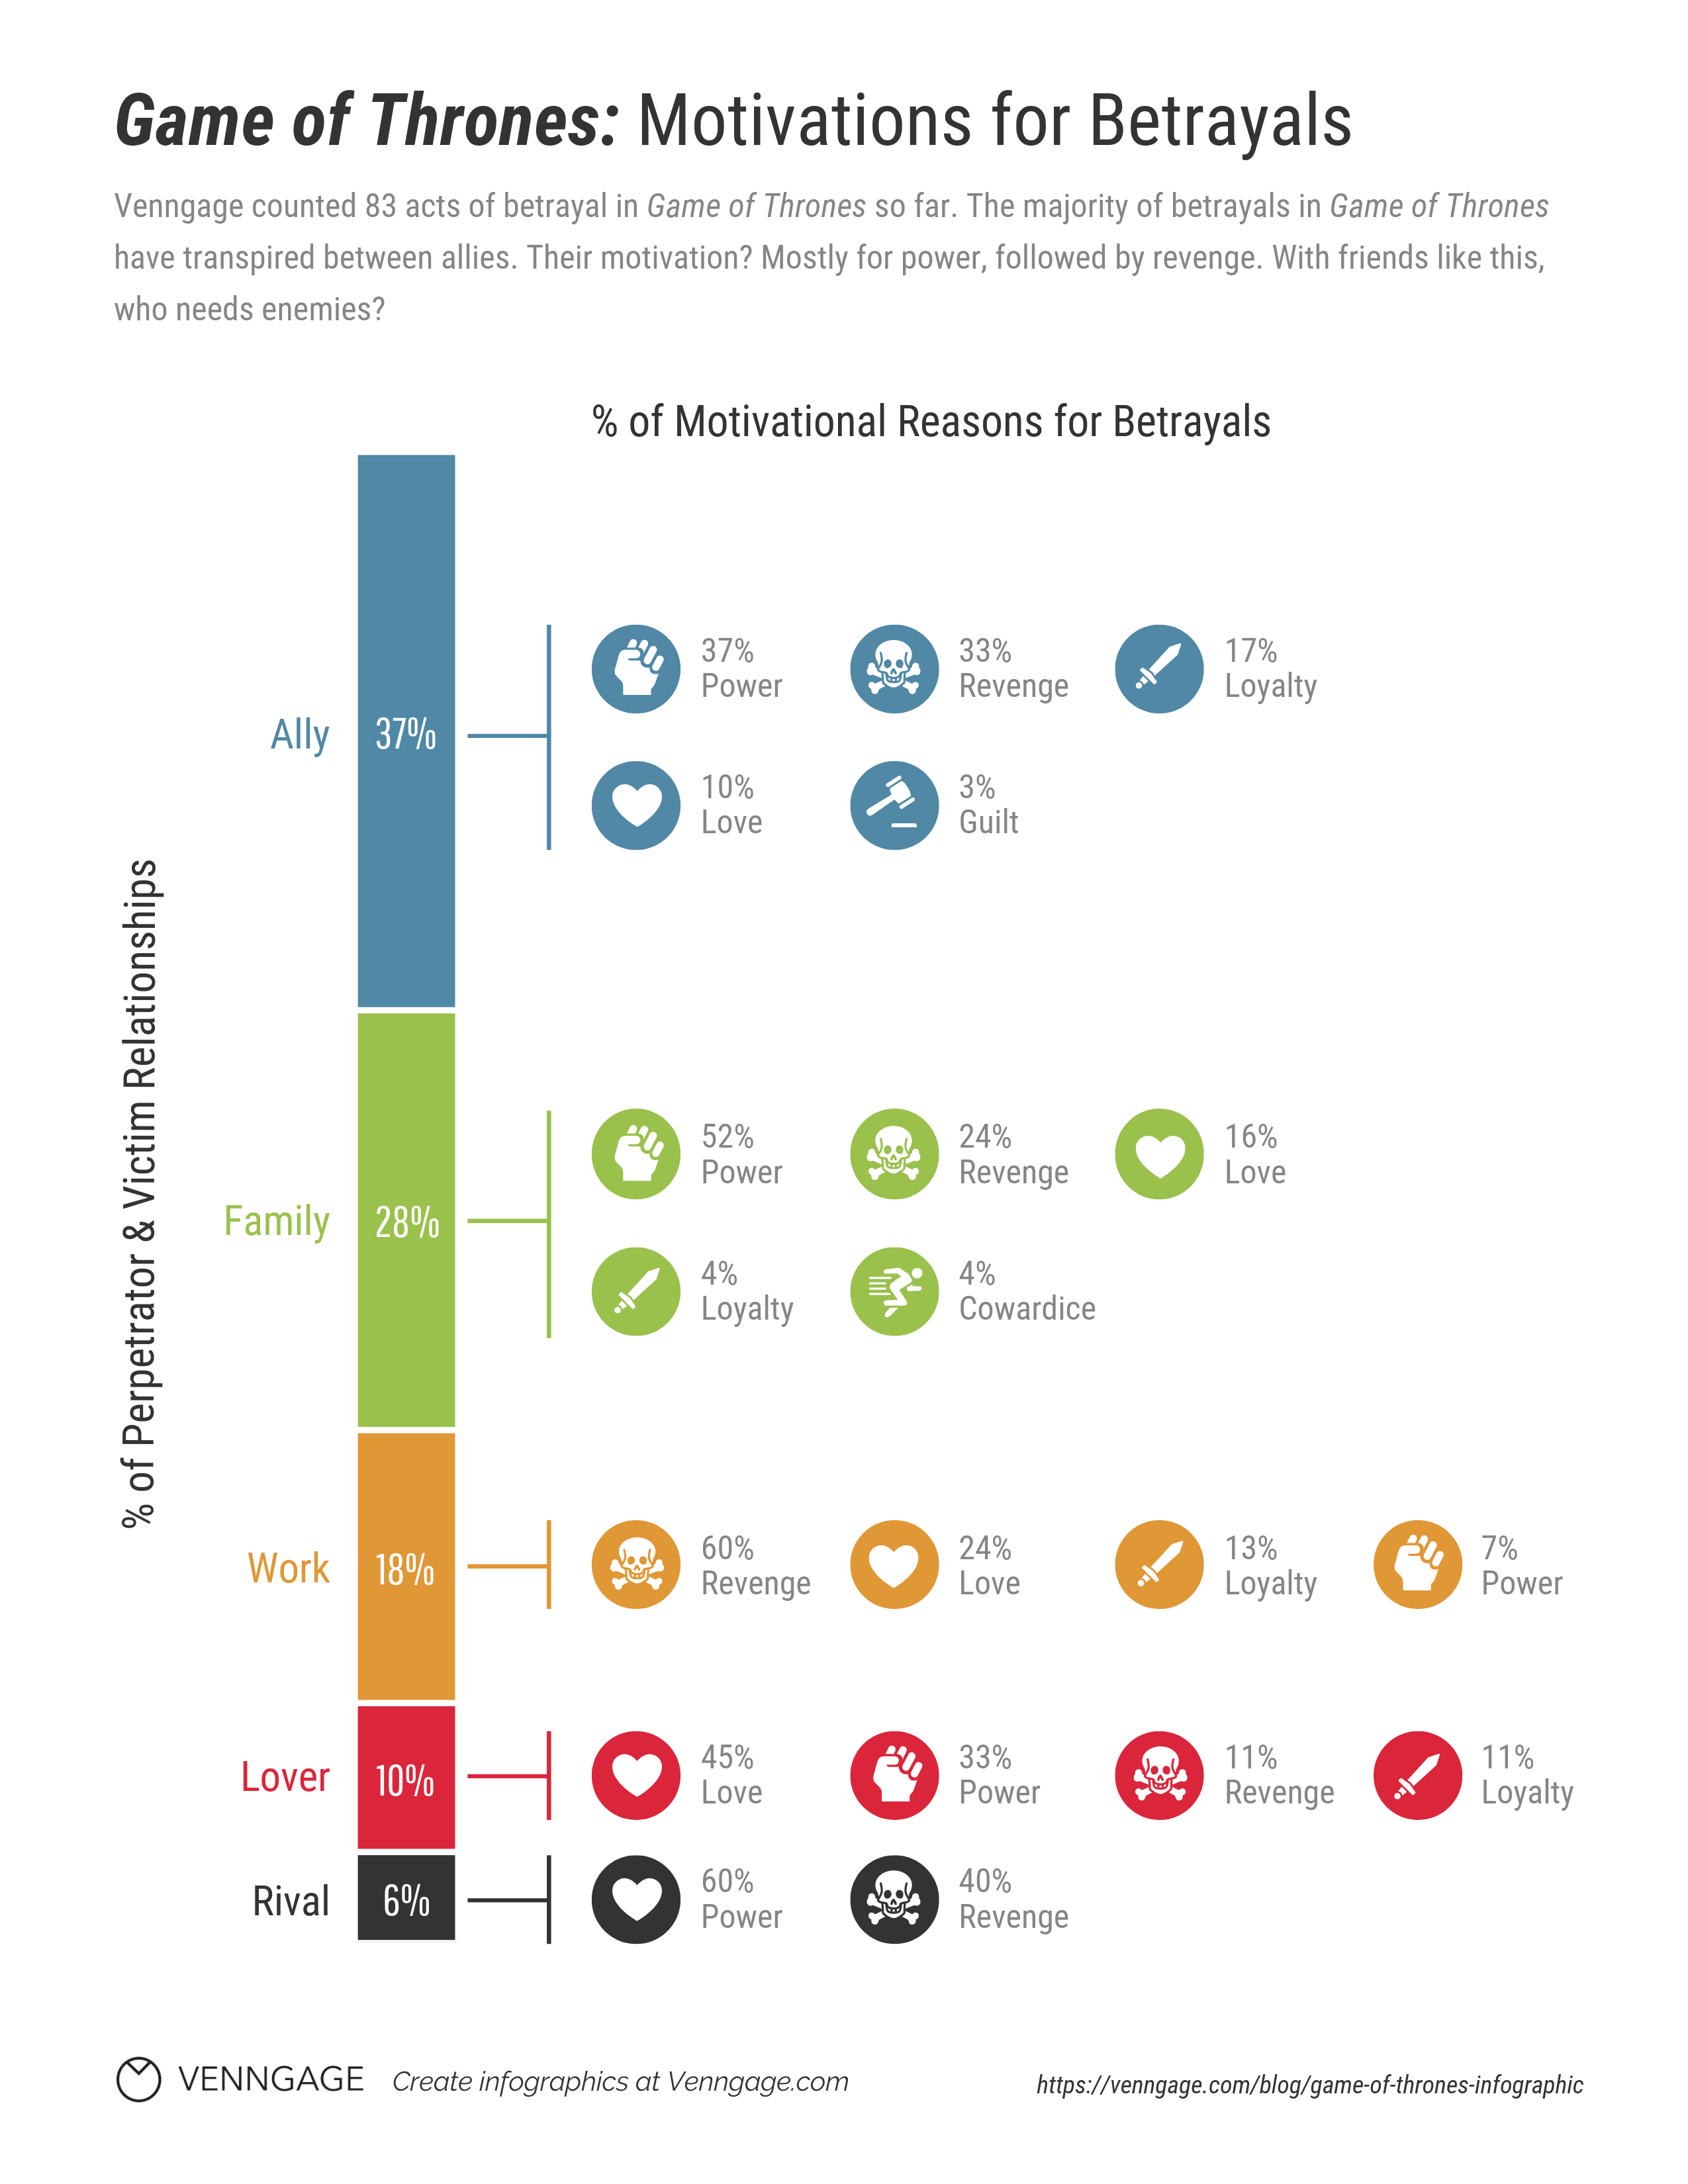
This Game of Thrones infographic assumes readers already know the characters and plot, so it can focus directly on the motivations behind different betrayals:
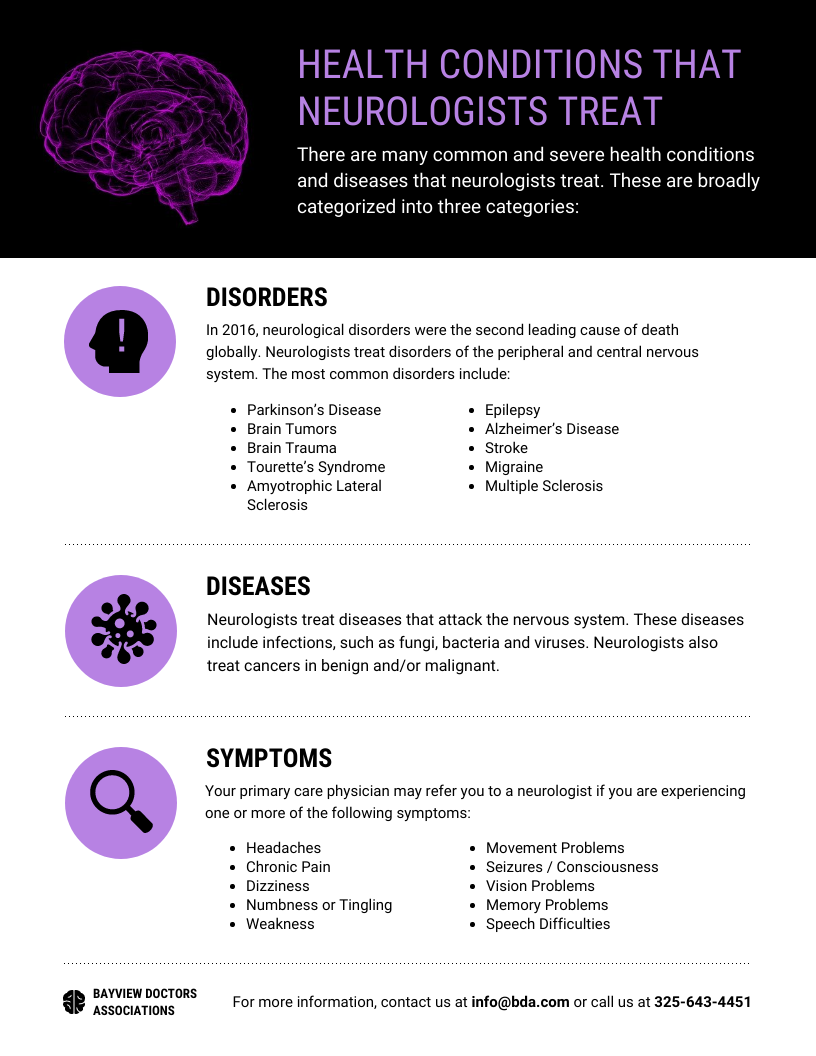
On the contrary, this neurological health infographic is meant for readers who may not know the topic, so it provides more explanation before getting into the details:
Step 2: Decide what you want to communicate
Next, look at the type of research you have. Quantitative research gives you numbers, percentages and measurable patterns. Qualitative research gives you themes, opinions, observations or quotes. Some research combines both.
Many infographics rely heavily on quantitative research. Several others focus on qualitative research — descriptive or subjective information. And some may combine the two.
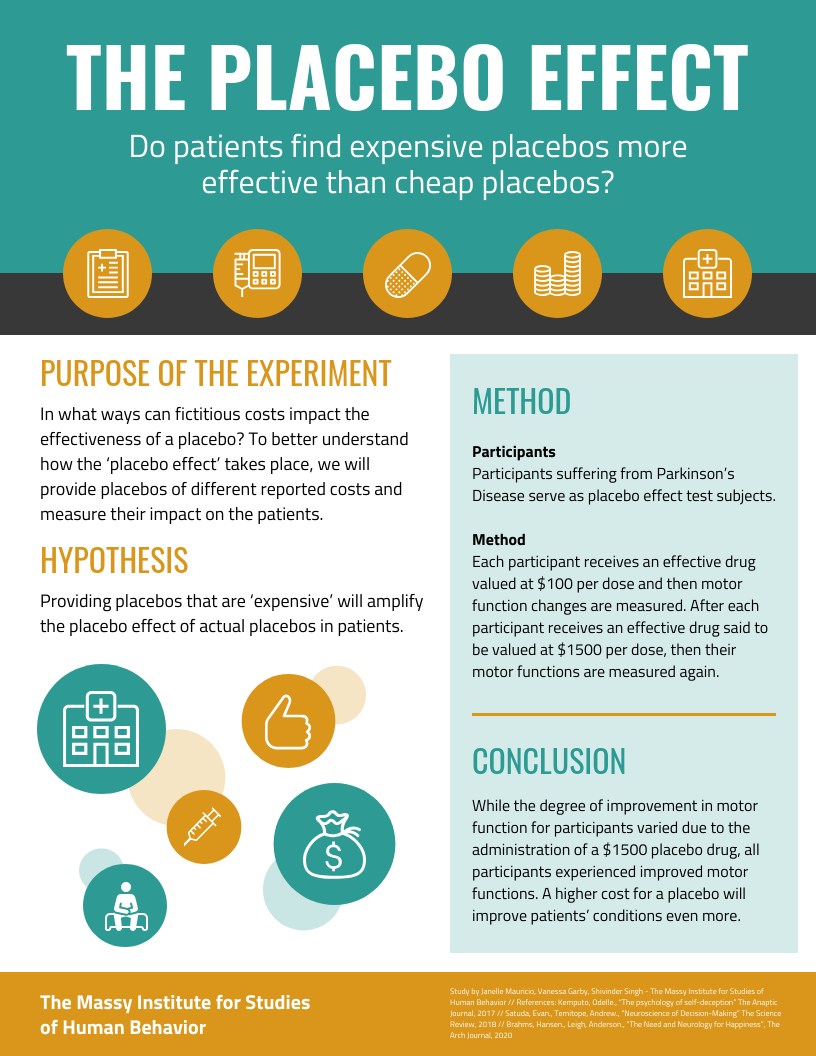
Let’s look at a few examples that drive home these differences. This infographic is qualitative in nature because it aggregates with subjective data:
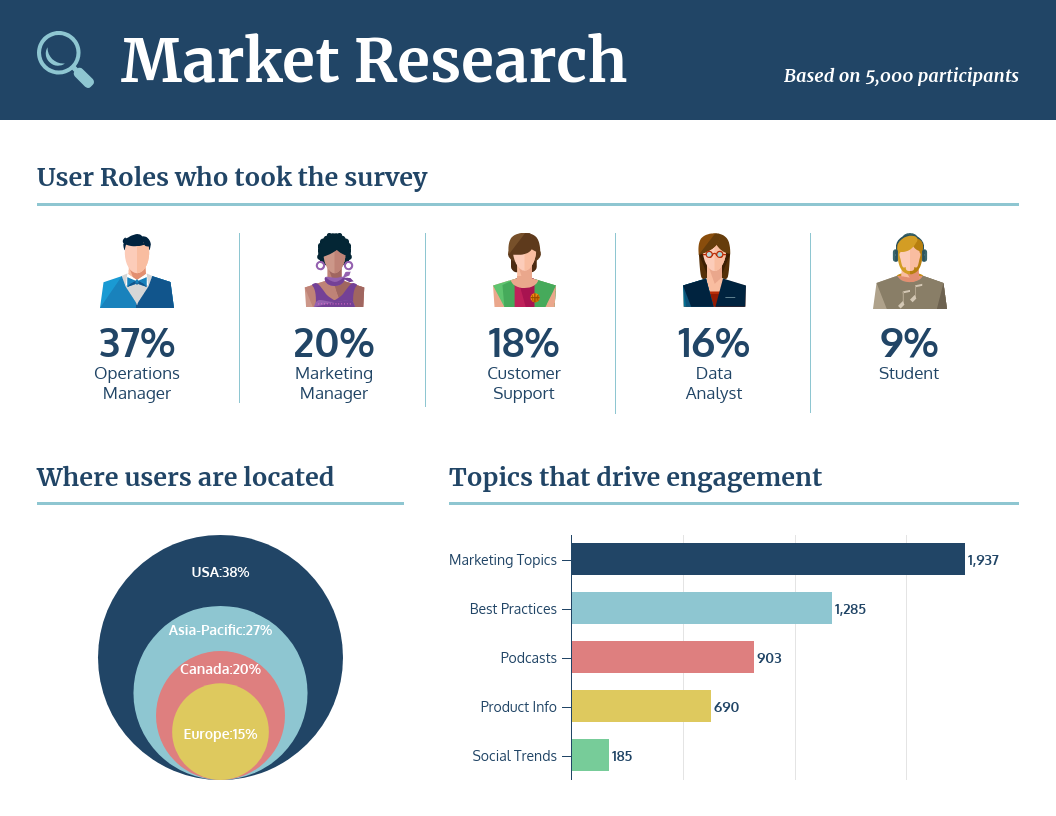
This market research infographic is quantitative — it uses data alone to report its findings. The only text included comes in the form of headings and labels:
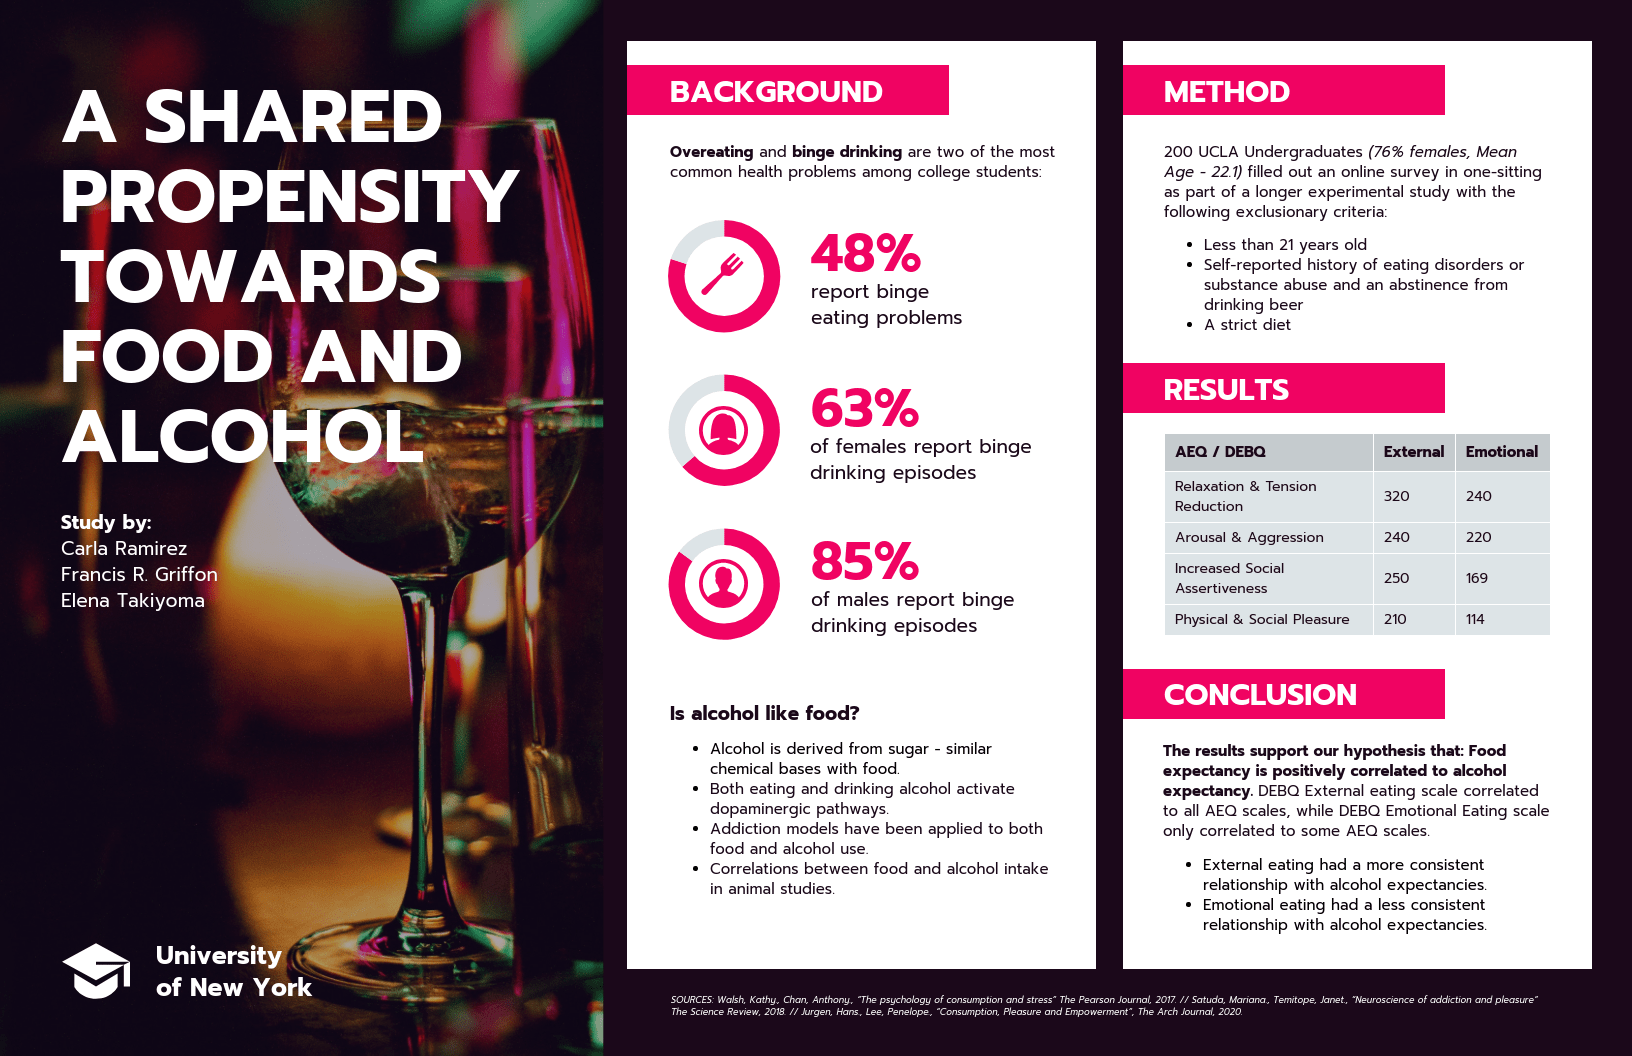
This next infographic blends knowledge-based insights and data, combining them into one cohesive story:
Once you’ve reviewed the research, decide what the infographic needs to communicate. You might be summarizing the overall findings, highlighting a particular trend or focusing on one important conclusion.
Then pull out the data, observations or quotes that support that focus. You don’t need to include everything from the original research.
Related: 7 Healthcare Infographic Templates to Use in Healthcare Settings
Step 3: Choose the best way to visualize your data
Once you’ve selected the findings to include, think about how each one should be presented. Are you summarizing the full research, highlighting a trend or explaining one key finding? The right visualization depends on what the data is showing.
For example, a trend over time may work best as a line chart, while comparisons between groups are easier to show with a bar chart. Survey percentages can be highlighted with a large statistic, pictogram or donut chart, while relationships between variables may need a scatter plot.
Here’s a quick guide:
Learn how you can pick the right charts or graphs for your data:
Step 4: Create a structure for your infographic design
The next step is to organize the information into an outline so you can identify gaps in your research.
You can outline the infographic in tools like Microsoft Word or Google Docs or simply jot it down on paper. In your outline, note what data you want to include and where and how you will place it.
It’s best to segment your outline into a beginning, middle and end:
- In the beginning, which could be as brief as the title, define the infographic topic. This can be the title, a subtitle and a short introduction.
- The middle is the meat of your infographic. However, it doesn’t always have to be in the middle of your page — depending on the template. Either way, the middle consists of all the facts, figures and content to tell a story.
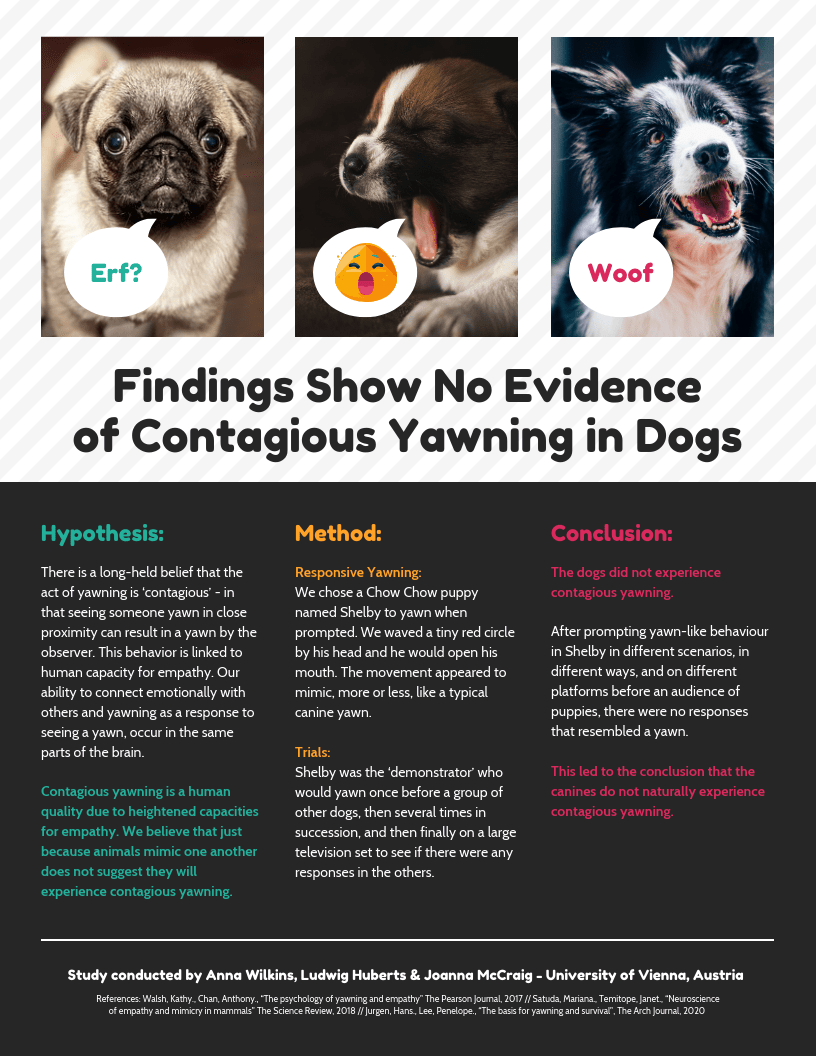
- Most infographics end with a strong call to action (CTA). But you can also include citations or contact information, like this one does:
Step 5: Design the infographic
Once your content and structure are ready, you can start designing the infographic.
The easiest option is to start with a research infographic template. Venngage has professionally designed infographic templates that you can customize with your own data, text, colors and visuals. This gives you a ready-made layout instead of building the design from scratch.
This infographic template uses black, grey and white colors to blend informational content with data. Because the color palette is simple, a very clear, almost retro feel is obvious:
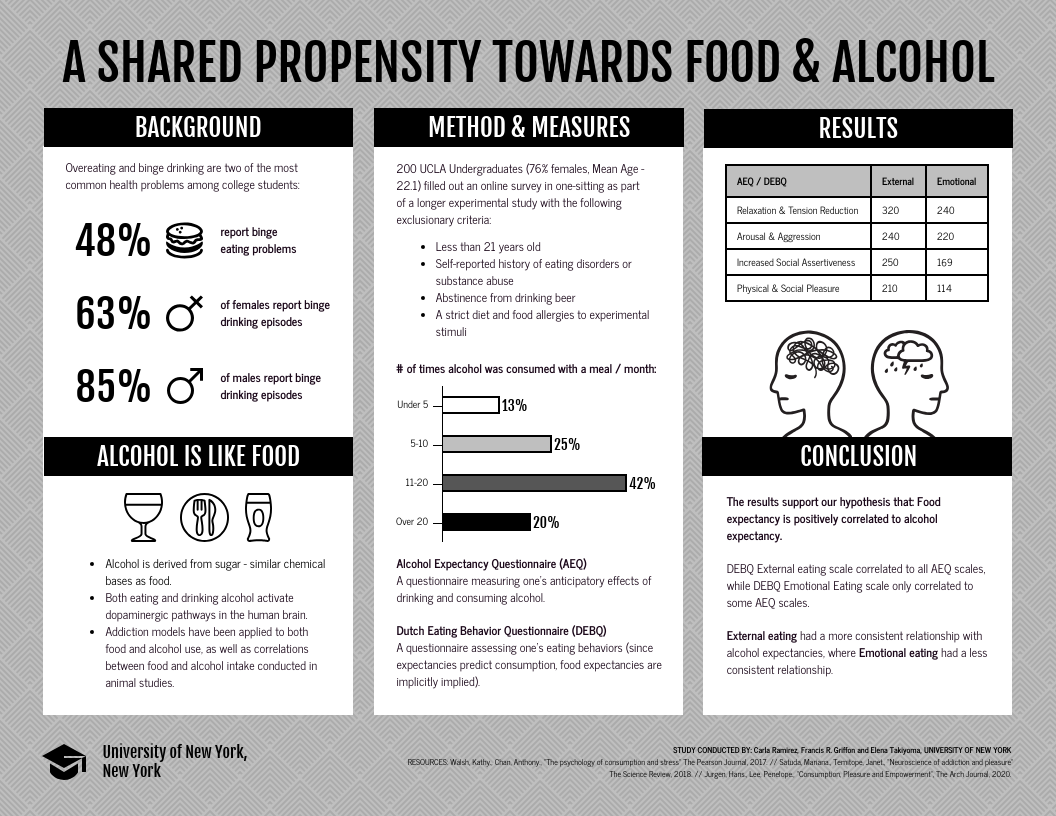
With a few tweaks, you can re-design the template to suit your needs. You can use brighter colors, relevant icons or modern font choices. Both are effective, but the right choice will come down to which best serves the audience.
You can also import data from Microsoft Excel or Google Sheets and turn it into charts directly inside the editor.
If you want to create the first draft faster, use an AI infographic maker tool. Venngage’s AI Infographic Generator can create a complete infographic from a simple text prompt, giving you a starting layout that you can then edit and refine.
Here’s an example of a research infographic on hybrid work and employee productivity created with Venngage:
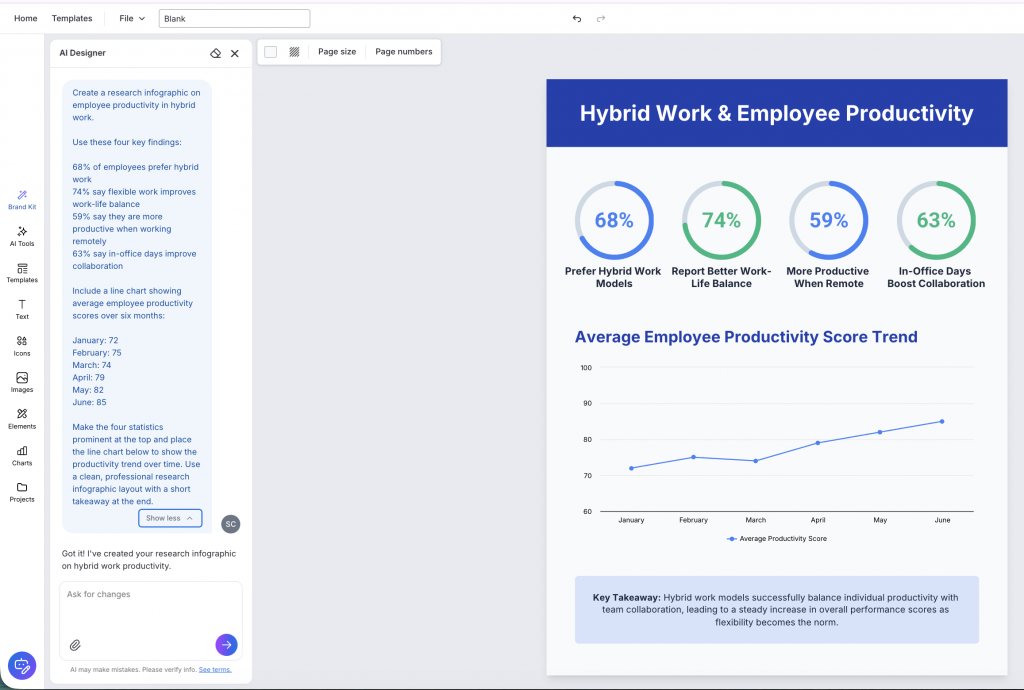
Once you’re happy with the design, refine the colors, fonts and visuals to ensure the style resonates with your audience. You can also ask the AI designer in the chat to suggest different layouts, color palettes, improve the text, or make the design more engaging.
For example, I asked it to add more descriptive icons, and it applied them in one click. This makes small design improvements much faster than editing each element manually.

This short tutorial video explains in clear steps how you can create an infographic with Venngage:
You can also choose the best format for your message by exploring different types of infographics.
Related: 6 Ways to Use Infographic Icons Like a Pro
Research infographic examples (With free templates)
Next, let’s explore examples to inspire your own design.
This infographic guides readers through a clear, structured flow:
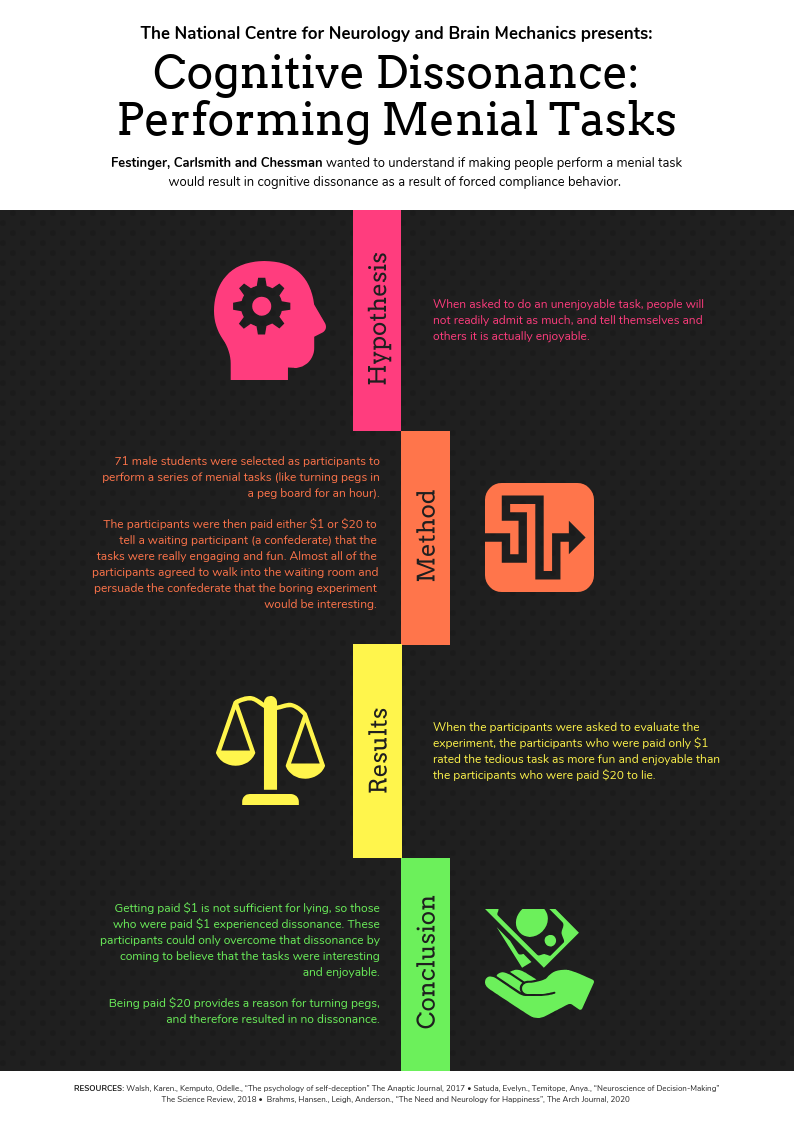
The boxes in the center act as an arrow that pulls the eye down the page, and color-coded content keeps everything separated.
This research process infographic example is ideal for explaining the steps in a scientific project. You can switch the colors and icons to make it suitable for any other domain:
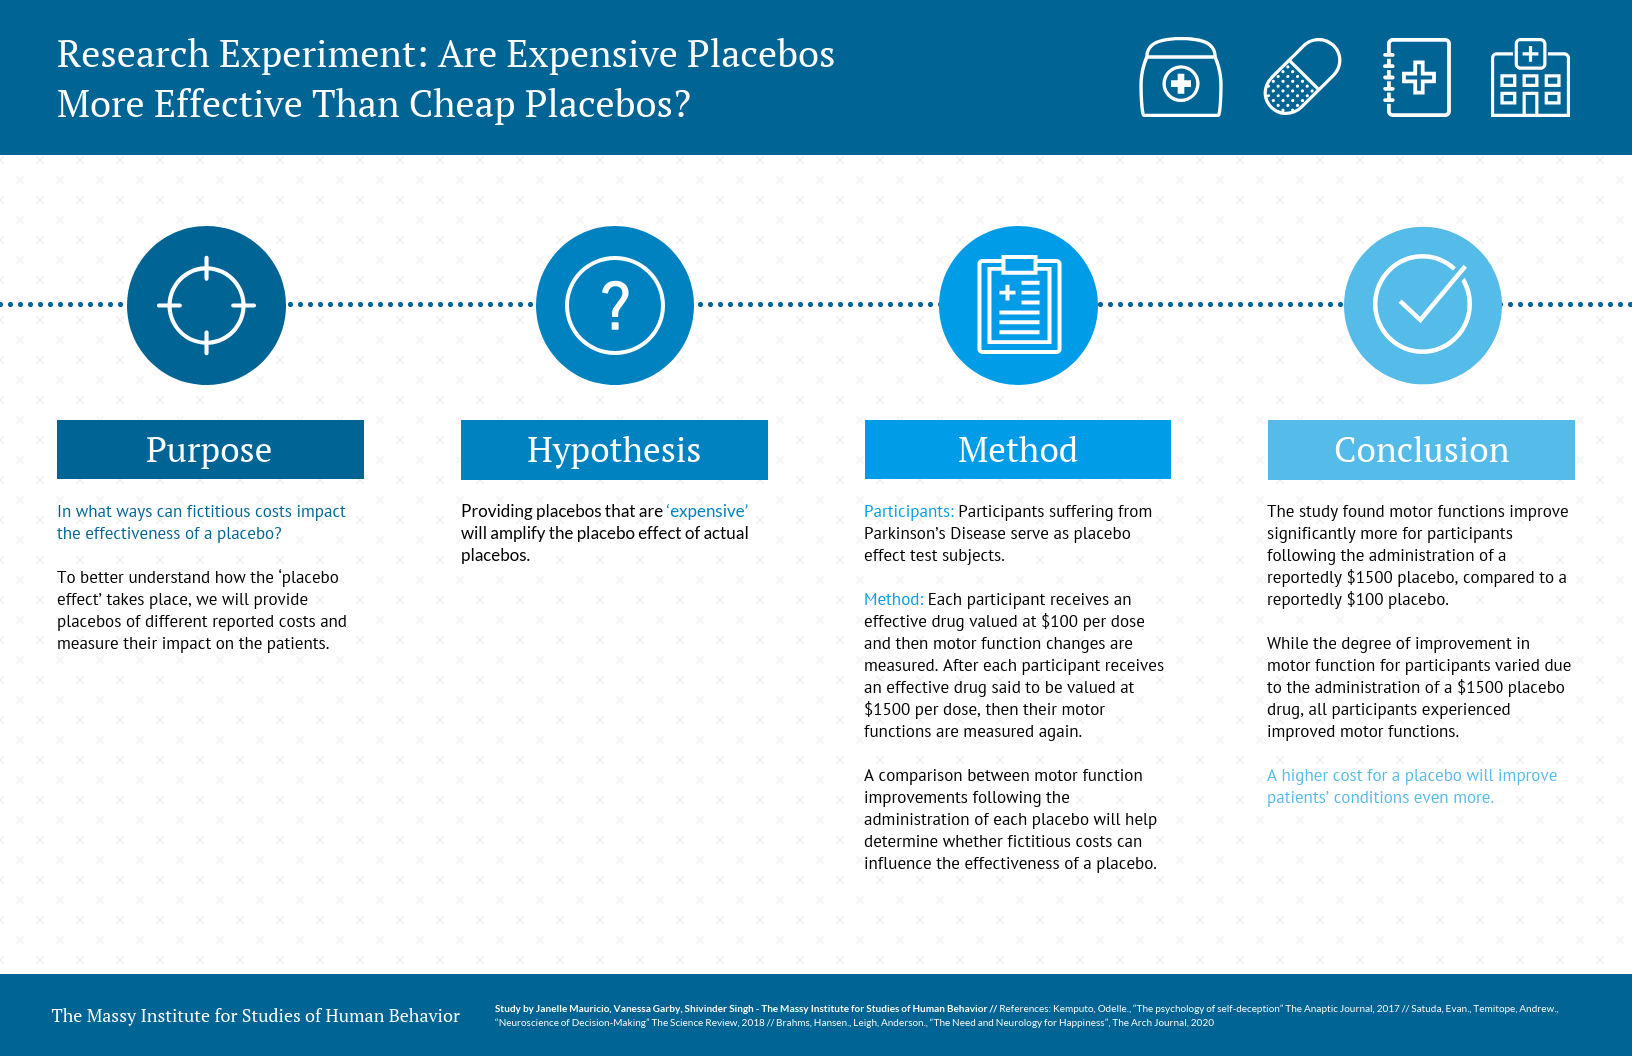
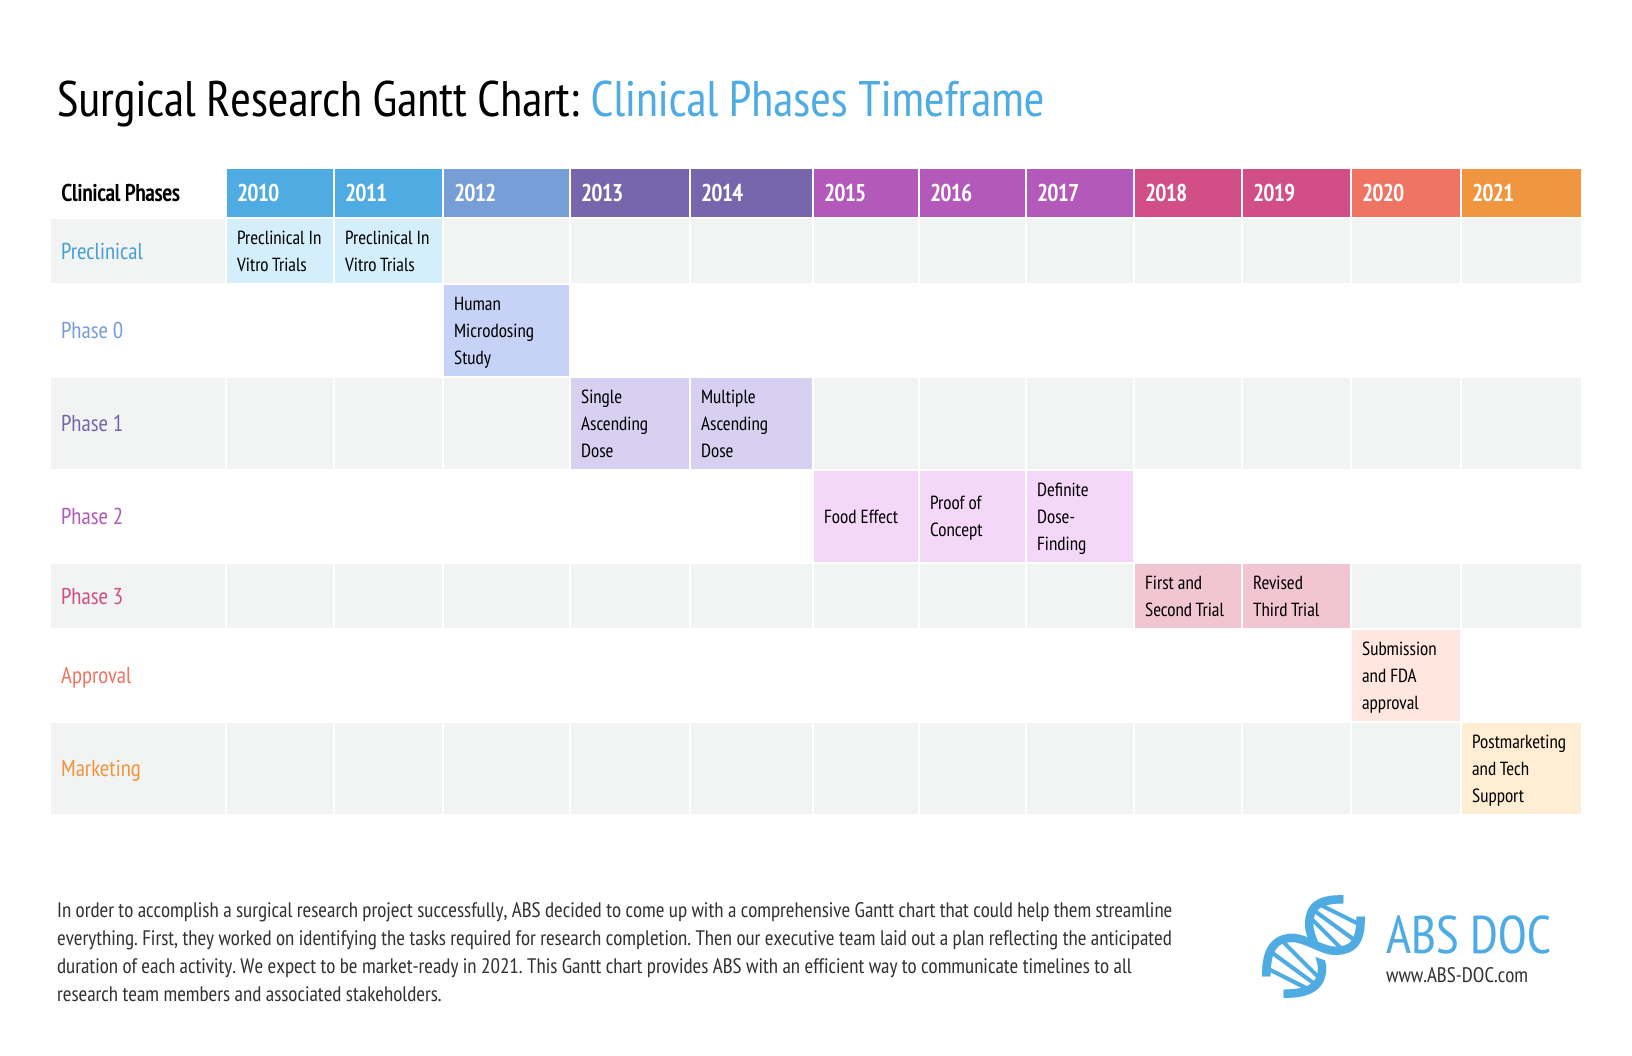
Getting approval for campaigns and budgets often requires outlining the research process upfront. This proposal infographic visualizes the timeline of a clinical study:
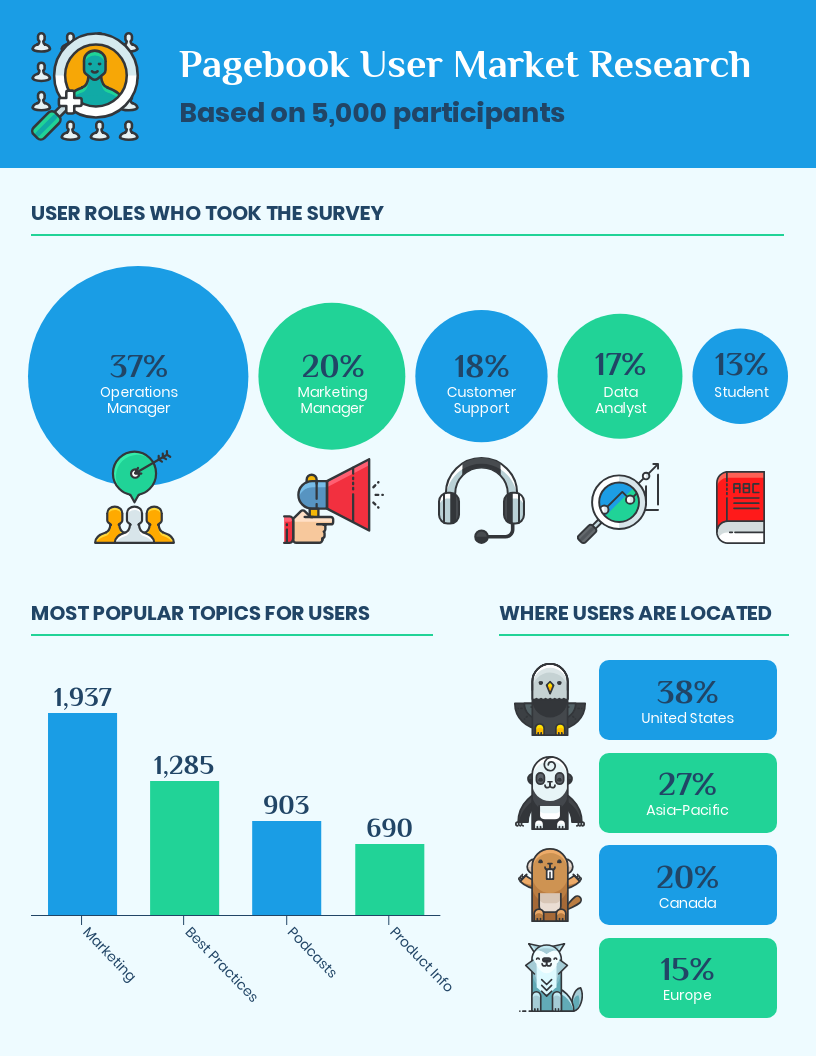
This market research infographic highlights key insights about survey participants. It’s perfect for quick-hit research summaries:
What are the essential elements to include in a research infographic?
Summarizing a study, presenting survey results or explaining research? These key elements can ensure clarity and impact:
Title and subtitle
Make your infographic title clear, concise and compelling to read. It should immediately communicate the infographic’s focus. Follow it with a strong subtitle to provide more context. Also, offer a brief explanation of the research topic or the key question being answered.
Here’s an example from an infographic that uses an interesting title and subtitle to grab the reader’s attention right away:

Introduction
Set the stage by explaining why this research matters. Provide a brief overview of the study’s purpose, the problem it addresses or the methodology used. This section gives your audience context before they explore the findings.
The Game of Thrones infographics we saw above is a perfect example. It has an introduction section right after the title that explains the rationale behind the research.
Key findings and data
Highlight the most critical takeaways from the research. Use short, impactful statements supported by statistics, survey results, or key insights. Prioritize clarity — avoid information overload by focusing on the most relevant points.
Visual elements
Charts, graphs, icons and illustrations make your data more engaging and easier to understand. Choose the right visuals to represent different types of information — bar charts for comparisons, pie charts for proportions, or timelines for trends. A well-placed visual can make complex insights instantly clear.
Comparisons and trends
Put your data into context by showcasing trends over time, differences between groups, or changes in behavior. You can use side-by-side comparisons to help readers grasp patterns at a glance. This can also make your findings look meaningful and actionable.
For example, let’s say you want to create an infographic to showcase survey results. You can use binary numbers, rating scales, word clouds or Venn diagrams to compare the findings.
Conclusion
Wrap up your infographic with a clear summary of key takeaways. Reinforce the research’s importance, suggest next steps or direct readers to related resources.
Sources and references
Credibility is crucial. Always cite your data, whether from research studies, academic papers or industry reports. A well-cited infographic builds trust and ensures your audience knows where your insights come from.
Learn more about how to cite an infographic in APA, MLA or Chicago citation styles.
Research infographic FAQ
1. How do I do research for an infographic?
To do research for an infographic, identify sources that will have the information you need by doing web searches of the topic. If you’re looking for data for your infographic, use “topic + statistics” or a similar query in the search engine. Make sure you note down the sources, including the URLs, to cite them later.
2. What type of research is presented best in an infographic?
Infographics are best for presenting quantitative research data, like statistics, percentages and comparisons. Charts, graphs, and maps make these data points easy to visualize and understand.
3. What are the ways to present the data gathered in your study?
To present data gathered in a study, you can use various methods including tables, graphs, maps, narratives, textual descriptions, infographics, box plots, histograms or even multimedia presentations.
You can also use textual summaries like descriptive statistics or qualitative analysis to add more context. Or, you can leverage visual aids like images or diagrams to improve clarity and simplify complex concepts.
4. How do I make an infographic from a research paper?
To create an infographic from a research paper, start with an outline that follows its structure. Fill it with key content, data or insights. Finally, arrange everything into a clear, logical layout.
5. What is the difference between a research poster and an infographic?
A research poster is a large-format, static visual used at conferences to present research findings and methods. It usually contains detailed textual information, graphs and charts.
In contrast, a research infographic presents data more concisely and in a visually engaging way. It also uses images, text and graphics for quick understanding and easy sharing.
Turn your research into meaningful infographics
When it comes to translating research into infographic form, it’s crucial to remember that your primary goal is serving the audience. For instance, you might find a data point personally fascinating. But if it doesn’t support your main message, it doesn’t belong in your infographic.
Research infographics are engaging and informative — even without flashy data visualizations. Start creating yours for free with Venngage’s easy-to-edit templates and drag-and-drop editor.