


When I first started managing projects, I thought it was all about keeping everyone on track, set some deadlines, assign tasks, send reminders. Easy, right? Not quite. It didn’t take long to realize how important it is to follow a structured workflow that keeps teams aligned and milestones clear.
That’s where the project life cycle comes in. It breaks the process into five manageable phases, each with its own goals, deliverables,and challenges. Whether you’re new to project management or looking to streamline your process, understanding this framework is key.
Need a starting point? These project plan templates can help you map everything out visually.
What is a project life cycle?
A project life cycle is the step-by-step framework that guides a project from start to finish. It breaks down the entire process into distinct phases, typically: initiation, planning, execution, monitoring and closure. Each phase has its own goals, deliverables and key milestones, helping teams stay organized, aligned, and on track.
Think of it as a roadmap that shows you what to do and when to do it, so you’re not just winging it from task to task. Whether you’re managing a small design project or a large-scale rollout, the project life cycle helps ensure consistency, clarity and successful outcomes.
Why project life cycle matters
When I skipped steps early on, things fell through the cracks, Missed deadlines, confused team members, last-minute scrambles. Sound familiar? That’s why the project life cycle matters. It brings structure to the chaos.
By following each phase, you’re not just reacting, you’re proactively guiding the project from start to finish. It helps teams stay aligned, manage resources better, hit key milestones and avoid burnout (yours included). It’s not just about keeping things organized, it’s about leading projects with clarity and confidence from start to finish.
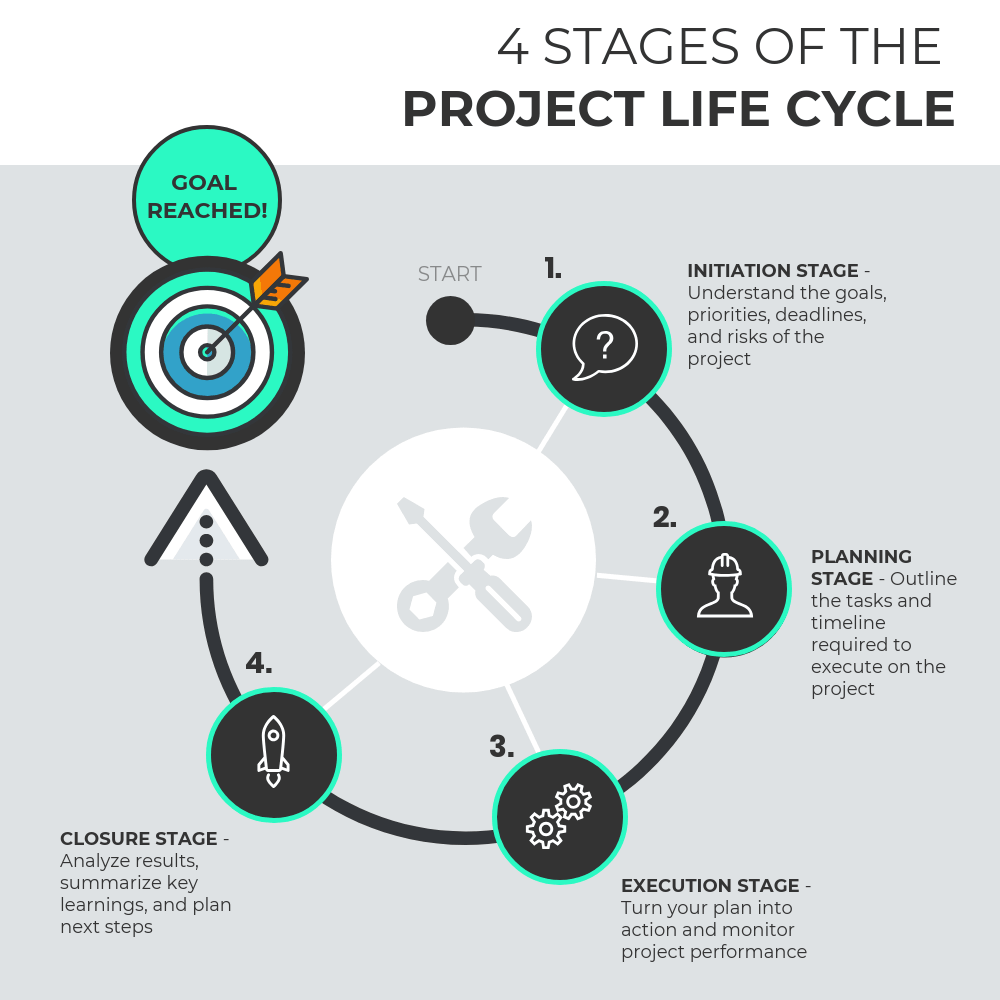
What are the 5 main stages of the project life cycle?
- Phase 1: Initiation: Define project goals, evaluate feasibility and establish the project’s purpose and stakeholders.
- Phase 2: Planning: Create a comprehensive project blueprint outlining tasks, timelines and resource allocation.
- Phase 3: Execution: Put the project plan into action, ensuring effective communication and coordination among team members.
- Phase 4: Monitoring: Track project progress, identify any deviations and make necessary adjustments to keep the project on course.
- Phase 5: Closure: Complete all project tasks, obtain client approval and conduct a thorough review to capture valuable insights for future projects.
Understanding and planning for the 5 stages of the project life cycle can help you manage, organize and plan so your project will go off without a hitch.
A project management life cycle will help:
- Ease communication between project teams and stakeholders with the help of agile project management tools
- Ensure goals are achievable with the available resources
- Help mitigate risk and keep projects on track
But what does each stage of the cycle look like?
Phase 1: Initiation — Define goals and scope
The initiation stage of the project management life cycle is when you meet with clients and stakeholders to understand their goals, motivations and hopes for the project.
During this stage the aim is to hash out the high-level goals that must be met for you to consider the project a success. There’s lots of research, discovery and discussion, but very little detailed planning in this phase.
The key project management steps for the initiation stage include:
- Identifying project objectives and deliverables
- Outlining project risks, dependencies, constraints and priorities
- Establishing project scope based on deadlines and available resources
- Submitting a project proposal for approval (our proposal maker can help you with that)
We’ve got a more detailed guide to writing a project management plan if you want more information. This covers project management basics along with all the elements that need to be included. You can also get PMP Certification to get specific training on how to do this.
I’ll go through the basics here.

Let’s take a look at what’s involved for each of these tasks.
Kick off the project management process by identifying project objectives and deliverables
Start by talking with your stakeholders or clients to get to know their needs. Try to tease out what’s important to them, what projects they’ve tried in the past and what they hope to see in the future.
From there, you can move on to building out the concrete objectives and deliverables that your team will be responsible for, given the scope of the project and the available resources.
Be sure to document the takeaways from these initial meetings…you’ll want to have a record of the agreed-upon deliverables when it comes to the project closure stage.

Pro-tip: Set S.M.A.R.T. (specific, measurable, achievable, relevant, time-bound) goals. For example: “In 3 months, increase blog conversion rates by 5%”.
Outline project risks, dependencies, constraints and priorities
Once you’ve mapped out the high-level project goals, it’s time to explore all of the variables that might impact the progress of the project, including:
- Risks: Factors that can negatively impact the cost, goals, timeline, or results of a project
- Dependencies: Relationships between activities or tasks
- Constraints: Limiting factors like technology, resources, time and cost
By identifying all of these variables early on you can nip a lot of potential problems in the bud, before they throw off your whole project timeline.
A risk breakdown structure, like the one below, can aid in identifying and assessing all of the risks in your project. A risk breakdown structure is a hierarchical representation of risks, starting with the high-level risks and then breaking it down into more granular risks. It can be an essential tool for project risk management.

Establish project scope based on deadlines and available resources
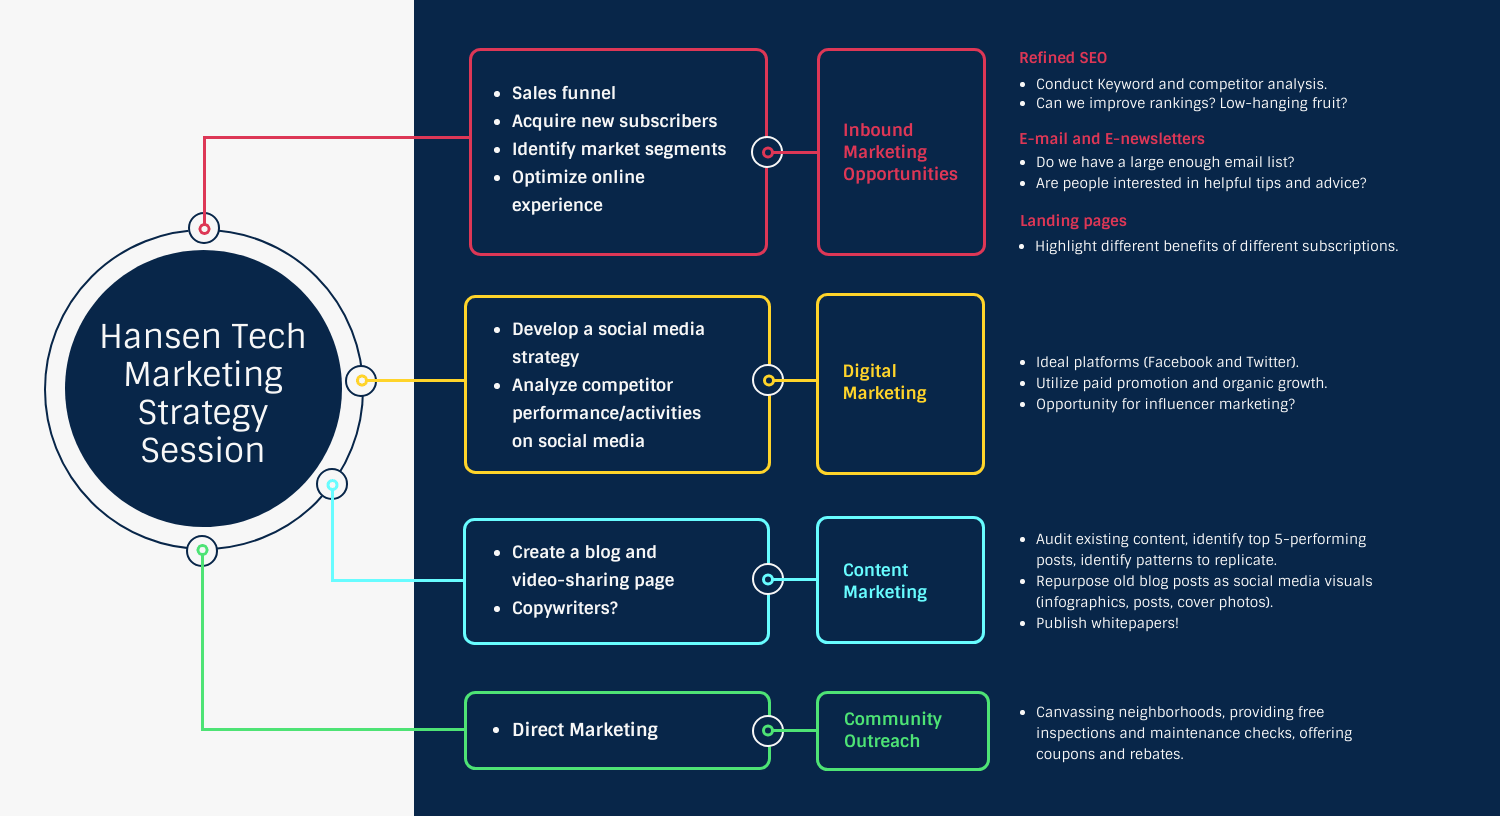
With a handle on all of the variables at play, you can start breaking the project down into more actionable steps. Set boundaries on project scope based on your deadlines and the resources at your disposal and think about what skill set your future team will need.
Mind maps and flowcharts can be helpful for organizing all of the moving parts to map out what’s reasonable based on project constraints.
Summarize the takeaways of the project initiation stage in a project proposal
All of the details that you establish during the initiation stage should be outlined in a project proposal, the only major deliverable for this initiation stage.
A project proposal is a report that details all of the goals, scope, requirements, budget, participants and deadlines of a project.

Not to be confused with a project plan, which includes a much more in-depth description of how the project will be executed, a project proposal should be no longer than a few pages.
Depending on the complexity of a project, an action plan one-pager, like the one below, might suffice.
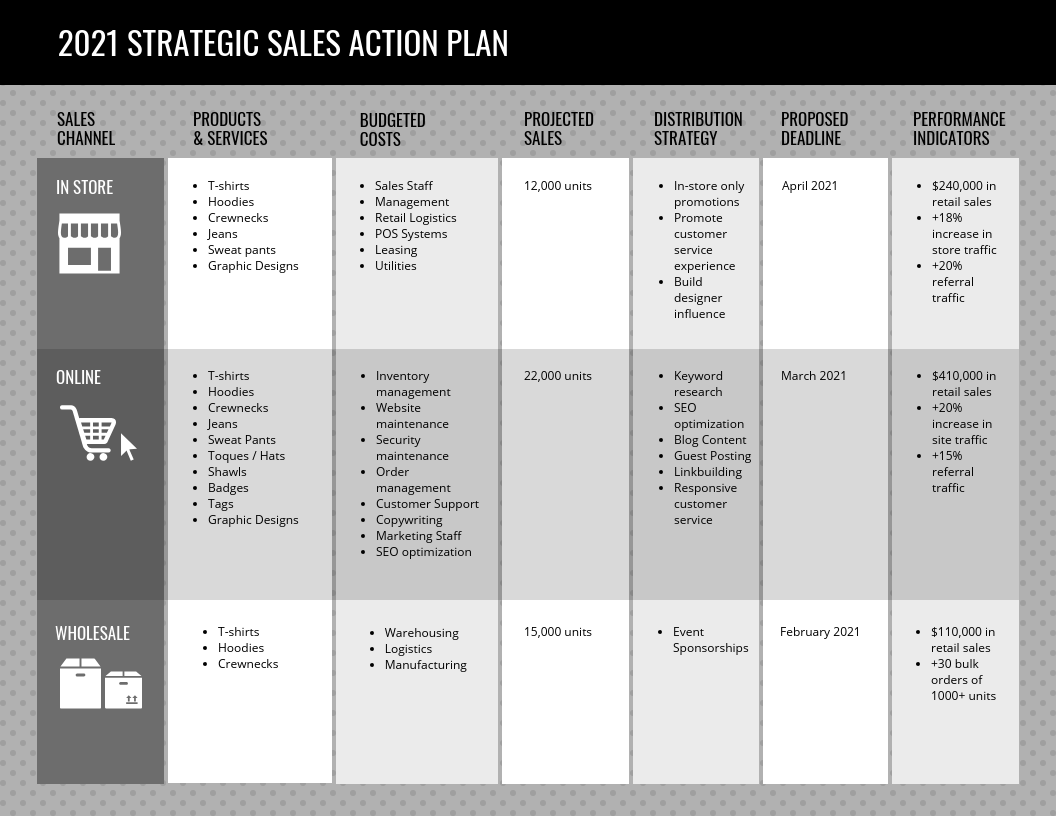
Check out our job proposal templates, business proposal templates and consulting proposal templates for more options.
Either way, when you’re a few months into the project, trying to prioritize the work of your team and make decisions that impact the direction of the project, you’ll thank yourself for creating clear documentation of these high-level project goals.
Create a professional looking project life cycle visualization
Make sure your project life cycle visualization sits within your company branding for a truly professional looking design. Venngage Business users can use the My Brand Kit and see their company colors, logos and fonts automatically applied to Venngage templates.
Business users can also invite feedback directly to their design with the Venngage comment feature. Learn more about My Brand Kit, Comment Mode and more features of the Venngage Business account:
Phase 2: Planning — Assign tasks and schedule
Once your project proposal has been approved, it’s time to move on to the project planning stage of the project life cycle.
The project planning stage is when you create a comprehensive project plan, which involves:
- Translating your proposal into a series of actionable tasks and scheduling them in a project roadmap
- Documenting processes or workflows that your team will use (you could try using a process infographic for this)
- Creating measurable short-term goals from high-level project goals
- Addressing potential issues that could derail your roadmap
This project plan will be the source of truth for your team when any questions, conflicts, or issues arise throughout the project.
Let’s dig into the most important major deliverable of the project planning stage: the project roadmap.
Create a project roadmap with project tasks and milestones
Creating a project roadmap is one of the more important project management life cycle steps, crucial for organizing your team and keeping work on track. A project roadmap outlines all of the start and end dates of every major project task (plus any big milestones you’re working towards).
Pro Tip: Use our roadmap maker to create professional, engaging roadmaps.
Gantt charts (like the one below) are a great tool for project roadmapping, because they can show the duration and timing of a number of dependent tasks. They’re perfect for planning and scheduling and eventually monitoring progress throughout the execution stage of the project life cycle.

The best thing about using a Gantt chart for your project roadmap?
You can show a number of concurrent timelines on a single chart, which makes it easy to account for task dependencies.
For example, this Gantt chart template shows project tasks for multiple teams over the course of a few months:

The visual format of a Gantt chart makes visualizing and adjusting for dependencies much easier than a spreadsheet. And because it’s visual, it’s easy for you team to see, understand and give feedback on their upcoming tasks.

Once your roadmap is in place, the last step of the planning stage is to assemble your team and hold a project kickoff, launching you into the next stage of the project life cycle: the execution stage.
Check out this blog post for more Gantt chart templates.
Phase 3: Execution — Complete deliverables
The project execution stage is the true start of the project, when you carry out all of the tasks and activities you mapped out in the planning stage.
This is where the majority of the project work takes place and it requires constant monitoring. Expect to adjust your goals and roadmap as you get deeper into the project.
As a project manager, your main responsibilities of the project execution stage are to:
- Monitor and control the execution process, reviewing the quality of the team’s output
- Adjust and update tasks, goals and deadlines to meet changing conditions
- Communicate between your team and the project stakeholders
Create status reports to communicate execution progress throughout the project management process
Although most of your time during the execution stage of the project management process will be spent monitoring and adjusting to keep the project on track, you’ll also need to keep stakeholders up to date with any changes to the project status.
Using a project status report template, like the one below, will help make sure you don’t leave out any pertinent details when you’re communicating with stakeholders.
For example, this status report includes an overview of project performance so far, plus up-to-date project milestones:

While this status report template is shorter, focused around an executive summary, but includes space for notes from every team representative:

KPIs and budget updates should also be included, if you have any.
Phase 4: Monitoring — Track and adjust
The monitoring and controlling stage of a project is a critical phase that ensures project activities align with the predetermined objectives and milestones.
During this phase, project managers and stakeholders closely oversee project progress, assess performance and make necessary adjustments to keep the project on track.
Effective monitoring and controlling practices are essential for mitigating risks, identifying potential issues and ensuring the project’s timely completion within the allocated budget.
During the monitoring and controlling stage of a project, the key project management steps include:
- Measure and assess the project’s progress against the project plan and key performance indicators.
- Identify and manage potential risks that could impact project objectives, and implement strategies to mitigate these risks.
- Monitor and evaluate the quality of project deliverables to ensure they meet predefined standards and client expectations.
- Assess and handle any changes to project scope, schedule or resources effectively, while considering their potential impact on the project.
- Maintain open lines of communication with stakeholders, keeping them informed about the project’s progress and addressing any concerns or issues promptly.
- Identify and address any project issues or conflicts that may arise, aiming to resolve them efficiently to prevent delays or disruptions.
Create a quality control checklist to maintain consistent quality standards throughout the project lifecycle
To systematically evaluate each deliverable against established quality benchmarks can take a lot of time. A great tip for project managers is to use a quality control checklist to quickly identify any deviations or discrepancies and take corrective actions to maintain the overall quality of the project.
Quality control checklists help in maintaining consistent quality standards throughout the project. By defining specific quality criteria, project managers can ensure that all deliverables meet the same level of quality, thereby enhancing the overall project integrity and customer satisfaction.
These checklists enable the early identification of any deficiencies or discrepancies in the project deliverables. By detecting quality issues early in the project lifecycle, quality control checklists help in minimizing the need for rework and additional corrections.
Here’s a quality control checklist template you can use in the monitoring and controlling stage of your project:

Phase 5: Closure — Review and reflect
Once you’ve achieved your project goals and the results have been signed off on by your stakeholders, it’s time for the project closure stage.
In the project closure stage of the project management process, you:
- Hand off deliverables
- Release team members and project resources
- Analyze project performance in a project retrospective
A project retrospective is as much about reviewing the success of the project as it is about extracting learnings that can apply to future projects. Projects will never go without obstacles and there will always be things to learn that will ease the progress of other projects.
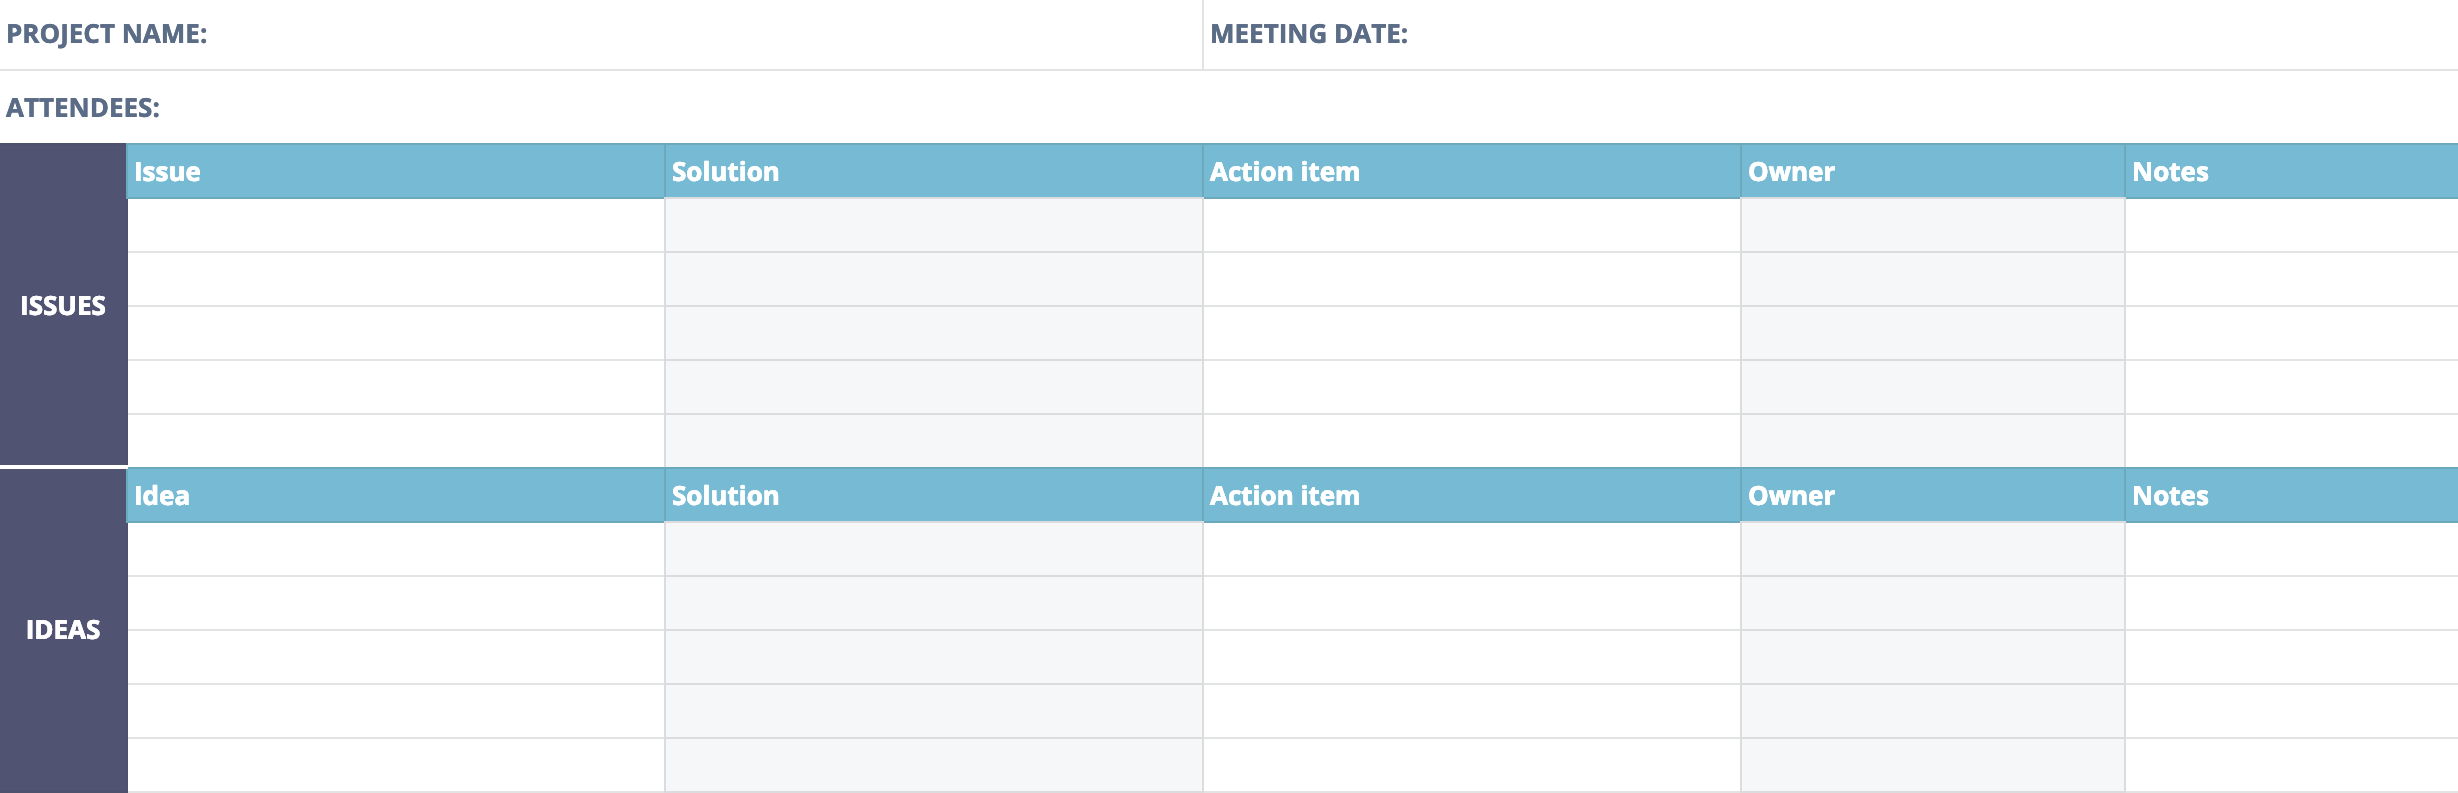
There are many ways to run a project retrospective meeting, but you should try to identify your biggest wins and losses and come up with solutions. If you’re an external consultant, you might even ask your client for feedback.
Keep track of your notes somewhere that will be accessible by your whole team, like a shared spreadsheet (or send out an email after the meeting):
Another duty of a project manager in the project closure phase can be to analyze the performance of the team, based on the quality of their work and how well they were able to meet deadlines.
These performance reviews can be delivered to team members (or higher-ups) in the form of an easy to read visual summary, like the one below:

But remember…your project isn’t complete until all of your documents have been handed over and approved by your client or stakeholder.
FAQs about the project life cycle
How is the project life cycle different from project phases?
They’re closely related, but here’s how I think of it: the project life cycle is the big-picture framework that outlines the full journey of a project from start to finish. Project phases are the individual stages within that cycle, like initiation, planning, execution, monitoring and closure. So, phases make up the life cycle.
Do all projects follow the same life cycle?
Not exactly. Most projects follow the same basic structure, but the details can shift depending on the industry, team or goals. For example, a marketing campaign might move faster than a product development project. The key is adapting the phases to fit your workflow, not forcing your work into a rigid mold.
How do I know if my project is off track?
In my experience, the warning signs show up early such as missed milestones, unclear roles, communication gaps or sudden changes in scope. If progress feels stalled or team members are unsure of next steps, it’s time to revisit your plan and see which phase needs attention.
What should be included in a project closure report?
A strong closure report wraps up the project and captures key takeaways. I usually include: a summary of what was delivered, how it measured up to the original goals, performance metrics, budget vs. actuals, lessons learned and next steps (if any). It’s a great way to document wins and identify areas for improvement.
Can I use templates to manage each phase of a project?
Absolutely, and I highly recommend it. Templates have saved me so much time, especially during planning and execution. They help standardize your workflow, keep things visual and make collaboration easier. These project plan templates are a great place to start if you’re looking for editable, ready-to-go visuals.
Use Venngage to communicate your progress throughout the project life cycle
Any project manager worth their salt knows that clear communication is the backbone of any successful project. Venngage helps you make your communication visual, so that you can wow clients and keep your team aligned.


